How to Plan and Build Your Smart Home: A Step-by-Step Guide for Beginners


1. Introduction

Why Build a Smart Home?

A smart home can transform daily life, creating a connected environment that responds to your needs, optimizes energy use, and increases security. Smart technology allows you to integrate lighting, climate control, security systems, and entertainment in a way that enhances comfort, safety, and efficiency.

Here are the main benefits of building a smart home:

  • Convenience: Smart home technology brings many essential controls into one place, often accessible through a single app or even voice commands. With automation, you can set routines, such as turning on the lights when you enter a room or starting the coffee maker each morning.
  • Security: Smart home devices can provide real-time security alerts and allow you to monitor your home remotely. Security systems with cameras, motion sensors, and smart locks can work together to create a safer environment, giving you peace of mind.
  • Energy Efficiency: Smart home systems can automatically adjust lighting, heating, and appliance use to reduce energy consumption, helping you save on utilities while also lowering your carbon footprint.
  • Accessibility: For those with limited mobility or other disabilities, smart technology offers voice control and automation features that make everyday tasks easier. Accessibility-focused options allow you to control lights, locks, and more without needing to physically interact with them.

Overview of the Guide

This guide will take you through every step of planning and building a smart home. Here’s what you can expect to learn:

  • The Basics of Smart Home Technology: An overview of the essential components that make up a smart home.
  • DIY and Open-Source Options: Cost-effective, customizable solutions using platforms like openHAB and Home Assistant, along with a comparison of DIY and commercial devices.
  • Step-by-Step Setup and Automation: Guidance on selecting, installing, and integrating devices to create routines and automations.
  • Budgeting and Expansion Tips: Insights on balancing costs with functionality, including a cost comparison for DIY vs. commercial devices and tips for future scalability.

Whether you’re interested in DIY, commercial options, or a mix of both, this guide will help you build a smart home that aligns with your goals.


2. Defining Your Smart Home Goals

Now that you know what a smart home can offer, it’s time to define your specific goals. This section will guide you in identifying the features that matter most to you and help you create a customized smart home plan.

Assessing Your Needs and Priorities

To create a smart home that truly enhances your lifestyle, it’s essential to start by identifying your top priorities. Here’s how to assess your needs in key areas:

  • Security: If protecting your home is your main goal, focus on smart locks, cameras, motion detectors, and alarm systems. Together, these devices can provide a secure environment with real-time alerts and remote monitoring. You’ll want to prioritize security-focused devices if peace of mind and remote access are essential to you.
  • Energy Savings: For readers interested in reducing energy consumption, smart thermostats, lighting, and appliance controls are ideal. These devices help manage your home’s electricity and heating usage more efficiently, potentially lowering your energy bills. If energy efficiency is a priority, look for devices that can adjust based on occupancy and time of day.
  • Convenience: If simplifying daily routines is a top goal, look for voice-controlled hubs, automated lighting, and connected appliances. Convenience-driven smart homes aim to make everyday tasks easier, often automating repetitive actions. If the idea of a home that responds to your habits appeals to you, prioritize convenience-focused devices.
  • Entertainment: For entertainment enthusiasts, a smart home can create a seamless audio-visual experience. Smart TVs, home theater systems, and multi-room audio setups let you enjoy music, movies, and more without extra setup or manual controls. If you value high-quality entertainment experiences, consider entertainment-focused smart home setups.
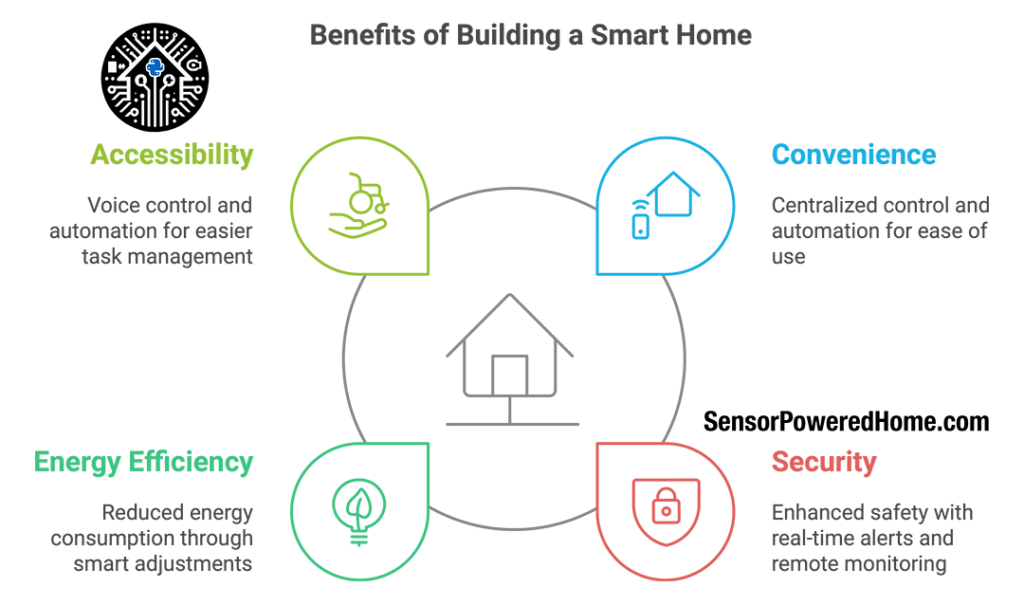
Infographic illustrating the benefits of building a smart home. Key advantages include improved energy efficiency, enhanced security, increased convenience, and seamless integration of smart home devices. This smart home guide highlights how home automation and DIY smart home setups can enhance daily life by optimizing energy use, providing remote monitoring, and automating routine tasks, making homes smarter and more efficient.

Choosing one or two primary goals will help you avoid overwhelming your system with too many new features and create a smart home experience that meets your specific needs.

Creating a Wish List

Once you’ve defined your priorities, draft a wish list of devices or features that align with those goals. This list will serve as your roadmap as you explore options, helping you stay focused on what truly matters. Here’s an example of how you might organize your wish list based on different goals:

  • Security:
    • Front door security camera
    • Smart door locks with remote control
    • Window and door sensors
    • Motion-activated outdoor lights
  • Energy Savings:
    • Smart thermostat with learning capabilities
    • Energy-efficient smart bulbs with remote dimming
    • Smart plugs with energy monitoring features
    • Solar-powered outdoor lights
  • Convenience:
    • Voice-controlled hub (e.g., Alexa, Google Assistant)
    • Routine lighting for daily activities (e.g., morning wake-up, evening wind-down)
    • Smart coffee maker integrated with a morning routine
    • Automated shades to close at night
  • Entertainment:
    • Smart TV with voice control and streaming options
    • Multi-room audio system for music in every room
    • Media server for easy access to movies and shows
    • Gaming console integration with lighting and audio effects

With your wish list ready, you can begin prioritizing items based on factors such as budget, ease of installation, and compatibility with existing devices. This will guide you as you start selecting the right components for your smart home, ensuring you focus on features that match your goals.

In the following sections, we’ll explore the core components of a smart home and how to select the devices that best fit your priorities.


3. Understanding Smart Home Components

Building a smart home involves more than just buying gadgets; it’s about creating a cohesive system where each device plays a specific role, enhancing your home’s functionality and adapting to your lifestyle. In this section, we’ll cover the core components of a smart home, the main categories of devices, and practical budgeting tips that include both DIY and commercial options.

Overview of Core Smart Home Components

Smart home technology is built around several core components, each serving a distinct function within the system. Here’s a look at some of the primary device types you’ll encounter when planning a smart home setup:

  • Hubs: A hub is often considered the “brain” of a smart home system, connecting and coordinating various devices across different brands or platforms. Hubs allow devices to communicate seamlessly, enabling centralized control through a single app or voice assistant. While some smart devices can operate independently, hubs are particularly useful when managing multiple devices that need to work together, such as creating a security or climate control routine.
  • Sensors: Sensors are essential for monitoring and triggering actions within the smart home. These include motion sensors for detecting presence, door/window sensors for security, temperature and humidity sensors for climate control, and even sensors that monitor air quality. Sensors add “intelligence” to your smart home by providing data that can be used to activate devices automatically, based on specific conditions.
  • Cameras: Cameras enhance security and convenience, offering real-time monitoring and recording of specific areas in or around your home. Smart cameras often come with additional features like motion detection, two-way audio, and night vision. These cameras can be accessed remotely, allowing you to keep an eye on your home no matter where you are.
  • Thermostats: Smart thermostats manage your home’s heating and cooling systems to improve energy efficiency and comfort. These thermostats can learn your schedule, adjust temperatures based on occupancy, and allow remote control via smartphone. Many smart thermostats integrate with other devices, such as sensors that detect room occupancy, to adjust climate settings automatically.
  • Lights: Smart lighting systems let you control and automate lights throughout your home, often through voice commands, smartphone apps, or motion sensors. They’re a popular entry point into smart home technology due to their ease of setup and immediate impact. From smart bulbs to wall-mounted dimmers, these devices allow you to customize lighting according to mood, schedule, or occupancy.
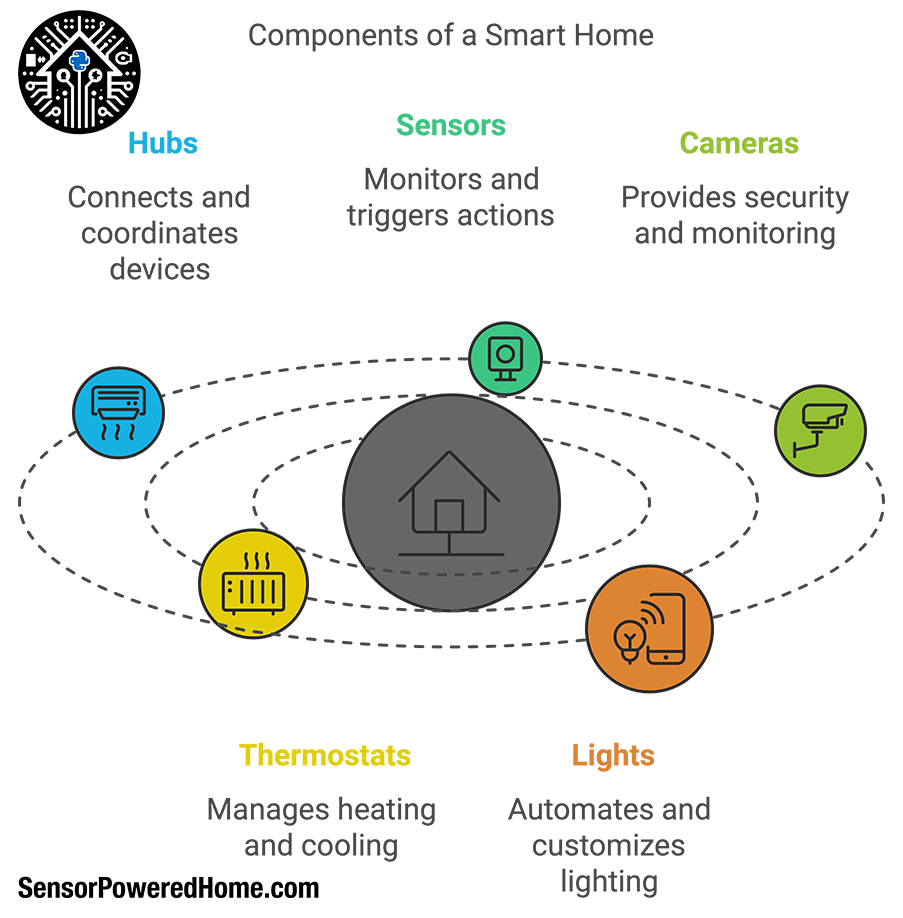
Infographic depicting essential components of a smart home, including various smart home devices used in home automation. Key elements highlighted are smart thermostats, security cameras, lighting control, and environmental sensors, which together enhance comfort, security, and energy efficiency. This smart home guide emphasizes how DIY smart home setups can integrate these devices seamlessly for an optimized, automated living experience.

Categories of Smart Home Devices

To create a functional and harmonious smart home, it’s helpful to understand the different device categories and their typical roles within the system. Here are the primary categories:

  • Security Devices: Security-focused devices like cameras, motion detectors, and smart door locks are designed to keep your home safe. These devices can alert you to unexpected activity, lock or unlock doors remotely, and provide video monitoring, allowing you to maintain security even when you’re away. Many security devices are designed to work in tandem with one another, creating a comprehensive security system that automatically activates when you leave home or at specific times of day.
  • Climate Control Devices: Smart thermostats and HVAC integrations give you precise control over your home’s temperature and air quality. For example, a smart thermostat can be programmed to maintain different temperatures in different zones or at various times, which can help reduce energy costs. HVAC integrations with humidity or CO2 sensors can also monitor and improve indoor air quality, contributing to a healthier living environment.
  • Lighting Devices: Smart bulbs, switches, and dimmers offer a flexible approach to lighting control. You can adjust brightness, color, and scheduling through an app or voice command. Automated lighting helps conserve energy and enhance security by giving the impression someone is home even when the house is empty. Lighting is also a key component in creating personalized routines, such as dimming lights for relaxation or brightening them to help you wake up.
  • Entertainment Devices: Smart speakers, TVs, and media hubs bring entertainment to the next level by integrating streaming services, voice controls, and multi-room audio. For instance, a smart speaker like an Amazon Echo or Google Nest can play music, control compatible devices, and answer questions, all with voice commands. Meanwhile, media hubs allow centralized access to streaming services, creating a seamless and enjoyable entertainment experience.
  • Utility and Appliance Devices: Devices like smart plugs, outlets, and kitchen appliances extend smart home technology’s reach into daily tasks. Smart plugs can turn traditional appliances into smart devices, giving you remote control over their on/off functions. Advanced appliances, such as smart refrigerators or coffee makers, allow you to automate daily tasks and monitor appliance status, saving you time and adding convenience.

Budgeting for Your Smart Home

When it comes to budgeting, it’s essential to consider not only the initial purchase price but also ongoing maintenance and potential upgrade costs. Many people assume smart home setups are prohibitively expensive, but there are options for every budget, especially if you’re open to DIY solutions.

  • Initial Costs: The cost of setting up a smart home varies widely based on the scope and complexity of the system you envision. A basic setup with a few lights, a smart speaker, and a thermostat may cost a few hundred dollars, while a full-home system with cameras, climate control, security, and entertainment features could run into the thousands. Initial costs are higher for commercial devices that come ready-made and usually include support and updates.
  • Ongoing Maintenance: Some devices require ongoing maintenance, like battery replacements for sensors or subscription fees for advanced security camera features. Maintenance costs may also include software updates or occasional repairs, which can add up over time, especially for high-end systems. DIY systems based on open-source platforms like openHAB and Home Assistant typically have lower ongoing costs, as they don’t rely on subscription-based services and can be updated and maintained independently.
  • Upgrade Considerations: Smart home technology evolves rapidly, so it’s wise to anticipate upgrade costs. Some homeowners start with a few core devices and gradually add others, spreading the investment over time. Choosing scalable technology—devices that can grow with your needs—ensures you won’t need to replace equipment frequently. Open-source platforms like Home Assistant allow for more flexibility in upgrades, as they integrate easily with a variety of device brands and new technologies.

DIY is Feasible

If you’re technically inclined, DIY is a practical way to build a cost-effective smart home. DIY solutions offer significant savings and customization flexibility. With open-source platforms like openHAB and Home Assistant, you can integrate a wide range of sensors and devices without being limited to a single brand. Here’s a look at some DIY options:

  • Sensors and Actuators: DIY sensors can include motion detectors, temperature and humidity sensors, and light sensors. Actuators, like smart switches or relays, allow you to control connected devices manually or through automation. These can often be sourced individually and configured with platforms like Home Assistant, which supports numerous protocols, including Zigbee and Z-Wave.
  • Open-Source Platforms: Both Home Assistant and openHAB are widely used, open-source smart home platforms that allow you to control devices and create automation routines without relying on a centralized commercial ecosystem. They support integration with hundreds of devices, providing a budget-friendly solution with no subscription fees.

Cost Comparison Table

Below is a comparison of typical costs for DIY vs. commercially available sensors, actuators, and platforms, highlighting where savings can be achieved:

ComponentDIY Cost RangeCommercial Cost RangeSavings with DIY
Motion Sensor5 -1530 -5015 -35
Smart Thermostat50 -80 (DIY kit)150 -250100 -170
Smart Light Bulb10 -2015 -505 -30
Security Camera20 -60 (DIY build)100 -30080 -240
Open-Source PlatformFree100 -200 (Hub-based)100 -200

With DIY, you can significantly cut costs by selecting individual components and assembling them yourself. However, DIY solutions require more technical knowledge and time for setup, while commercial devices offer easier installation and support. Ultimately, a combination of both approaches allows for a flexible, cost-effective smart home setup tailored to your needs.

In the following section, we’ll explore different smart home platforms and how to choose one that meets your goals and works well with your devices.


4. Choosing a Smart Home Platform

Choosing the right smart home platform is one of the most crucial steps in building a functional and user-friendly system. A platform serves as the control center of your smart home, linking various devices and enabling centralized control through a single app or voice assistant. This section will provide an overview of popular platforms, guide you on assessing device compatibility, and offer insight into balancing ease of use with customization.

Popular Platforms and Their Pros & Cons

Several platforms dominate the smart home landscape, each offering unique features, integrations, and levels of control. Here’s an overview of the most popular options, including open-source solutions like openHAB and Home Assistant.

  • Amazon Alexa: Known for its compatibility with a vast array of smart devices, Alexa is a popular choice for its accessibility and ease of use. Alexa-enabled devices are easy to set up and offer voice control for compatible products, but Alexa’s functionality may be limited for users who need advanced customization.
  • Google Assistant: Google Assistant is another widely compatible option, with integration across smart speakers, phones, and displays. It excels at natural language processing, making voice commands intuitive and responsive. Google Assistant is a solid choice for beginners and integrates well with Google’s ecosystem, though it may lack the advanced automation and custom rules found in open-source options.
  • Apple HomeKit: Apple’s HomeKit platform prioritizes privacy and security, making it appealing for users deeply invested in Apple’s ecosystem. With features like adaptive lighting and secure remote access through iCloud, HomeKit offers a seamless experience for iOS users. However, HomeKit-compatible devices are somewhat limited compared to other platforms, and users outside of Apple’s ecosystem may find it restrictive.
  • Samsung SmartThings: SmartThings offers broad compatibility with various devices and brands, allowing users to control devices from multiple ecosystems through one app. It supports Zigbee and Z-Wave protocols, making it a good option for mixed device environments. While user-friendly, SmartThings’ reliance on a cloud-based infrastructure can limit control and speed.
  • openHAB: openHAB (Open Home Automation Bus) is a powerful open-source platform that supports hundreds of device integrations across multiple protocols. It’s especially suitable for beginners, thanks to its Blockly Rules and Semantic Model. The Blockly Rules feature uses a visual, block-based programming system, allowing users to create automation rules without coding experience. The Semantic Model further simplifies device organization by categorizing and structuring devices based on their locations and functions. This intuitive setup, combined with a community-driven ecosystem, makes openHAB a flexible and accessible platform for both beginners and advanced users.
  • Home Assistant: Another open-source platform, Home Assistant provides extensive customization and integration options, supporting over a thousand devices and services. It requires some technical knowledge for initial setup but offers unparalleled flexibility. With local control and privacy-focused design, Home Assistant is ideal for users who want to keep their data secure and have full control over automation. However, its complex interface may be overwhelming for beginners.
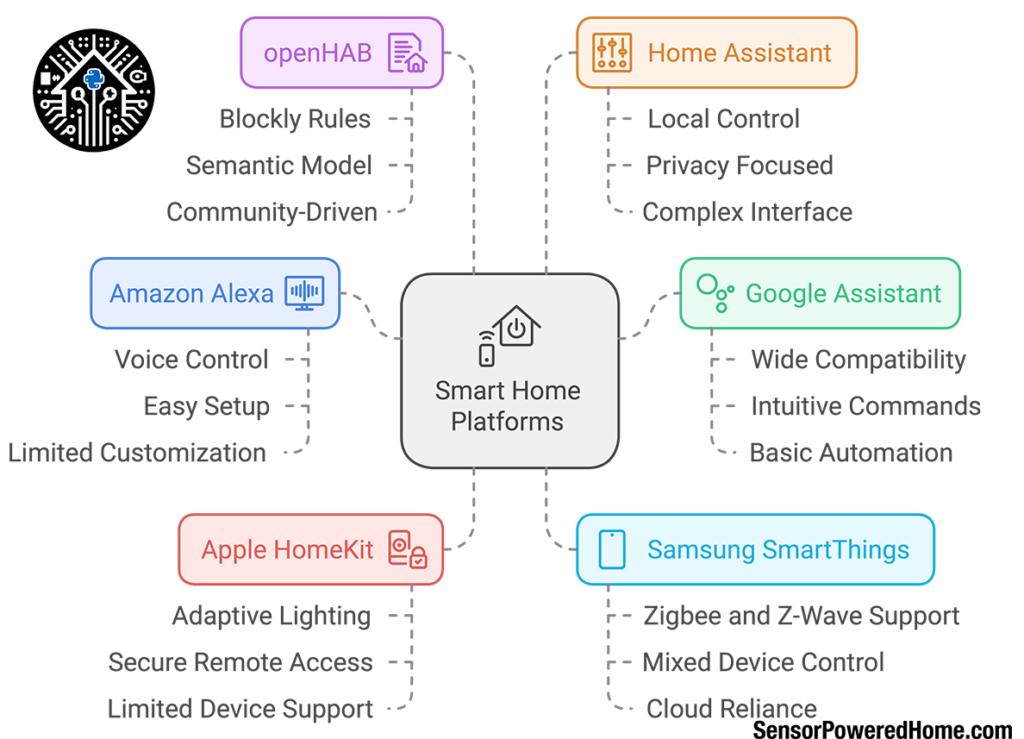
nfographic showcasing popular smart home platforms for managing smart home devices and home automation. Featured platforms include openHAB and Home Assistant for DIY smart home setups, as well as Amazon Alexa, Google Assistant, Apple HomeKit, and Samsung SmartThings. Each platform is highlighted with key features, compatibility, and functionality, offering a comprehensive smart home guide for beginners and enthusiasts to choose the best platform for their automation needs.

For a deeper dive into these platforms, see our related article: Introduction to Home Automation Apps for Beginners.

Assessing Compatibility with Existing Devices

One of the first things to consider when choosing a platform is compatibility with your existing devices. Each platform has unique integrations and may support certain devices better than others. Here’s how to ensure compatibility:

  • Device Ecosystem: If you already own smart devices, check the compatibility lists provided by each platform to see which ones work seamlessly. For example, Alexa and Google Assistant have broad compatibility with numerous brands, while Apple HomeKit is more limited to Apple-certified devices.
  • Communication Protocols: Platforms may support different communication protocols, such as Wi-Fi, Zigbee, Z-Wave, or Bluetooth. SmartThings, for example, supports both Zigbee and Z-Wave, which makes it compatible with a wide variety of smart home devices. For users interested in open-source options, both openHAB and Home Assistant support a broad range of protocols, making them adaptable for future expansions.
  • Long-Term Integration: Consider how well each platform will support future additions. Open-source platforms like openHAB and Home Assistant are particularly strong in this regard, as they have a dedicated community constantly adding new device integrations. Commercial platforms may be limited by proprietary ecosystems or require updates from the manufacturer for new device support.

Ease of Use vs. Customization

When selecting a platform, balancing ease of use with customization is essential, especially if you’re a beginner. Each platform offers different levels of control and complexity, and your choice should align with your comfort level and automation goals.

  • Beginner-Friendly Platforms: Amazon Alexa, Google Assistant, and Apple HomeKit are all highly accessible for beginners. These platforms offer straightforward setup processes, intuitive apps, and voice control for easy operation. However, they are generally limited in customization, with fewer options for advanced automations and personalized rules.
  • Customizable Platforms: For those looking to create highly customized smart home systems, open-source options like openHAB and Home Assistant provide the flexibility to configure advanced automations, integrate a broad range of devices, and even run local control. With openHAB’s Blockly Rules, beginners can create custom automations using a simple drag-and-drop interface, making it accessible without sacrificing customization. The Semantic Model in openHAB also organizes devices in a logical structure, making navigation and management easier for users of all experience levels.
  • Hybrid Options: Samsung SmartThings strikes a balance between beginner-friendly and customizable. While offering an easy setup and app control, SmartThings also provides more options for creating routines and linking devices than platforms like Alexa or Google Assistant. It’s a good choice for users who want more control without delving into complex setups.

In summary, your platform choice should align with your current needs and technical comfort level, while also allowing for future growth. Beginners may appreciate the user-friendly interfaces of commercial platforms, but for those seeking a blend of accessibility and power, open-source options like openHAB—with its Blockly Rules and Semantic Model—provide a unique combination of simplicity and customization.


5. Planning Your Smart Home Network

Setting up a reliable network is fundamental for any smart home, as it ensures seamless communication between devices, reduces connection drops, and maintains the security of the entire system. The following summaries provide insights from two articles that offer essential network planning tips for smart home users.

Executive Summary of Network Essentials

Article Summary: Building a Reliable Smart Home Network – Part 1
This article introduces the basics of setting up a stable network infrastructure specifically tailored for smart homes. It covers critical network requirements and best practices for optimizing router placement and reducing interference from other electronic devices. It explains how smart homes require reliable, high-speed internet to support multiple connected devices and highlights the importance of positioning routers centrally and away from physical obstructions to enhance Wi-Fi coverage. The article also provides practical tips on selecting routers with the latest standards, such as Wi-Fi 6, which offers faster speeds and better device handling capabilities for smart home applications.

Key Takeaways from Part 1:

  • Optimal Router Placement: Place routers centrally, on elevated surfaces, and away from interference to maximize Wi-Fi coverage.
  • Choosing the Right Router: Use routers that support the latest Wi-Fi standards (Wi-Fi 6) to handle multiple devices effectively.
  • Managing Bandwidth: Prioritize bandwidth for critical smart devices and allocate network resources to avoid congestion.

Article Summary: Building a Reliable Smart Home Network – Part 2
The second part delves into more advanced networking options for larger homes or setups with numerous devices. It explains the benefits of mesh Wi-Fi systems, which use multiple nodes to extend coverage evenly across the home, and discusses the use of VLANs (Virtual LANs) to create segmented networks. VLANs are especially valuable in smart homes because they allow users to separate IoT devices from personal devices, enhancing security by isolating potential vulnerabilities in IoT connections. This article emphasizes the need for WPA3 encryption to protect data from unauthorized access, offering a guide to setting up secure networks.

Key Takeaways from Part 2:

  • Mesh Wi-Fi for Larger Homes: Mesh Wi-Fi extends coverage seamlessly across larger areas and reduces dead zones.
  • VLANs for Improved Security: Segmenting networks with VLANs isolates IoT devices from personal data, minimizing security risks.
  • WPA3 Encryption: Enabling WPA3 provides the latest encryption standard to protect data on the smart home network.

Security Measures for a Smart Home Network

Smart home networks are particularly vulnerable to security threats due to the large number of connected devices. The articles emphasize the importance of network segmentation (using VLANs) to separate IoT devices from primary devices, significantly reducing potential attack vectors. They also stress the need for WPA3 encryption, which is currently the most secure Wi-Fi encryption standard, to protect user data. Additionally, setting up a separate network for IoT devices ensures that even if one device is compromised, it does not expose personal data on the main network.

In summary, a well-planned network infrastructure not only supports smart home devices but also secures them. The articles underscore the value of mesh Wi-Fi systems for consistent coverage, VLANs for device segmentation, and WPA3 encryption for optimal security, providing a strong foundation for a smart home network that balances performance with protection.


6. Selecting and Installing Core Devices

When building a smart home, selecting core devices such as hubs, lights, thermostats, cameras, and voice assistants is essential to achieve a seamless, efficient setup. DIY options, while requiring more time and a learning curve, benefit from a robust and active community. Resources and community forums offer invaluable help, guiding beginners through setup and troubleshooting challenges. In this section, we’ll cover popular commercial and DIY options, detailing pros, cons, prices, and setup difficulty.

Smart Hubs and Controllers

A smart hub is the central controller of a smart home, connecting and automating various devices. Here’s a look at some top choices:

  • Samsung SmartThings Hub
    Pros: Broad compatibility with Zigbee, Z-Wave, and Wi-Fi devices, making it easy to integrate with products across multiple brands. Simple automation options are available, and it integrates well with Alexa and Google Assistant.
    Cons: Relies on cloud connectivity, which can introduce latency and raises security concerns.
    Price: Approximately 120<strong>Setup Difficulty</strong>: Beginner-friendly, with an intuitive app setup.</li> <!-- /wp:list-item -->  <!-- wp:list-item --> <li><strong>Amazon Echo with Alexa</strong><strong>Pros</strong>: Combines Alexa voice assistant functionality with basic smart hub control for Alexa-compatible devices. Straightforward to set up and use.<strong>Cons</strong>: Limited to Alexa's ecosystem, which restricts advanced automation options compared to dedicated hubs.<strong>Price</strong>: Around100
    Setup Difficulty: Very easy, with guided setup through the Alexa app.
  • DIY Hub with Raspberry Pi and openHAB
    Pros: Highly customizable, supports various devices, and offers local control, enhancing privacy and reducing latency. Thanks to openHAB’s Blockly Rules (a visual rule editor) and Semantic Model (an organization tool for devices), it’s a beginner-friendly platform for those who want DIY flexibility. Installing openHAB on Raspberry Pi is straightforward by following the official guide: openHAB Installation Guide. Using the openHABian image, you can easily set up openHAB on a Raspberry Pi with little prior experience.
    Cons: Requires time to configure and familiarize oneself with openHAB’s ecosystem, though community support and resources are readily available to help.
    Price: Raspberry Pi kits start at 70, and openHAB software is free.<strong>Setup Difficulty</strong>: Moderate learning curve; initial setup is simplified by the openHABian guide, but customization requires time and effort.</li> <!-- /wp:list-item --></ul> <!-- /wp:list -->  <!-- wp:paragraph --> <strong>Smart Hubs Comparison Table</strong> <!-- /wp:paragraph -->  <!-- wp:table --> <figure class="wp-block-table"><table class="has-fixed-layout"><thead><tr><th><strong>Hub</strong></th><th><strong>Pros</strong></th><th><strong>Cons</strong></th><th><strong>Price</strong></th><th><strong>Setup Difficulty</strong></th></tr></thead><tbody><tr><td>Samsung SmartThings Hub</td><td>Broad compatibility, easy automation</td><td>Cloud-dependent</td><td>120EasyAmazon Echo with AlexaVoice assistant, simple setupAlexa ecosystem limitations100</td><td>Very easy</td></tr><tr><td>DIY Hub (Raspberry Pi + openHAB)</td><td>Customizable, local control, robust community support</td><td>Setup time, moderate learning curve</td><td>70Learning curve, longer setup

    Smart Lights

    Smart lighting includes bulbs and switches that can be controlled remotely and automated. Here are some options:

    • Philips Hue Bulbs
      Pros: Known for high-quality color options and reliable control, compatible with Alexa, Google Assistant, and Apple HomeKit.
      Cons: Higher cost compared to other brands; requires a Philips Hue Bridge for full functionality.
      Price: Starts at 15 per bulb, with an additional cost for the bridge.<strong>Setup Difficulty</strong>: Beginner-friendly; plug-and-play with the bridge.</li> <!-- /wp:list-item -->  <!-- wp:list-item --> <li><strong>LIFX Bulbs</strong><strong>Pros</strong>: Does not require a hub, offers bright, color-rich lighting, and integrates easily with most major smart home platforms.<strong>Cons</strong>: Slightly pricier than other brands; Wi-Fi-only connection can cause occasional connectivity issues.<strong>Price</strong>: Around25 per bulb.
      Setup Difficulty: Very easy; setup via the LIFX app.
    • DIY LED Strip Lighting with ESP8266, Configured with openHAB
      Pros: Fully customizable, affordable, and ideal for users who enjoy hands-on projects. These LED strips can be automated through openHAB, enabling dynamic lighting control.
      Cons: Requires knowledge of electronics and programming, longer setup and configuration time, and familiarity with openHAB integration.
      Price: Approximately 15 for components, including LED strips and ESP8266 controller.<strong>Setup Difficulty</strong>: Longer setup time and learning curve; best for users comfortable with DIY projects.</li> <!-- /wp:list-item --></ul> <!-- /wp:list -->  <!-- wp:paragraph --> <strong>Smart Lights Comparison Table</strong> <!-- /wp:paragraph -->  <!-- wp:table --> <figure class="wp-block-table"><table class="has-fixed-layout"><thead><tr><th><strong>Light Option</strong></th><th><strong>Pros</strong></th><th><strong>Cons</strong></th><th><strong>Price</strong></th><th><strong>Setup Difficulty</strong></th></tr></thead><tbody><tr><td>Philips Hue Bulbs</td><td>High-quality, color options</td><td>Expensive, needs bridge</td><td>15+EasyLIFX BulbsNo hub required, vibrant colorsWi-Fi-only, costly25</td><td>Very easy</td></tr><tr><td>DIY LED Strip with ESP8266</td><td>Customizable, budget-friendly</td><td>Requires setup time, learning curve</td><td>15Learning curve, longer setup

      Smart Thermostats

      Smart thermostats provide precise climate control with scheduling and remote access options, making them ideal for energy efficiency. Here are some options:

      • Google Nest Thermostat
        Pros: Learns user habits to adjust temperatures automatically, integrates well with Google Assistant and Alexa, and is energy-efficient.
        Cons: Higher initial cost, with some advanced features behind a subscription paywall.
        Price: Ranges from 130-250 depending on the model.
        Setup Difficulty: Moderate; may require professional installation if wiring is complex.
      • Ecobee SmartThermostat
        Pros: Comes with a room sensor for optimal temperature control, built-in Alexa voice control, and compatibility with multiple smart platforms.
        Cons: High price point and somewhat complex interface.
        Price: Around 250.<strong>Setup Difficulty</strong>: Moderate; generally easy for homes with compatible wiring.</li> <!-- /wp:list-item -->  <!-- wp:list-item --> <li><strong>DIY Thermostat with ESP32 and openHAB Integration</strong><strong>Pros</strong>: Fully customizable with openHAB, allowing for specific zone control and unique automation configurations. Offers an affordable option with flexibility.<strong>Cons</strong>: Requires assembly, programming, and setup in openHAB; longer setup time and technical learning curve.<strong>Price</strong>: Approximately30 for components.

        Setup Difficulty: Learning curve involved with programming and setup, but extensive community support is available.

      Smart Thermostats Comparison Table

      ThermostatProsConsPriceSetup Difficulty
      Google Nest ThermostatEnergy-efficient, learns habitsHigher cost, subscription needed130+</td><td>Moderate</td></tr><tr><td>Ecobee SmartThermostat</td><td>Room sensor, voice control</td><td>Expensive, complex interface</td><td>250Moderate
      DIY ESP32 ThermostatCustomizable, openHAB-compatibleSetup time, learning curve30</td><td>Learning curve, longer setup</td></tr></tbody></table></figure> <!-- /wp:table -->  <!-- wp:heading {"level":4} --> <h4 class="wp-block-heading"><strong>Security Cameras and Motion Sensors</strong></h4> <!-- /wp:heading -->  <!-- wp:paragraph --> Security cameras and motion sensors are essential for home monitoring, providing alerts and recordings for safety and peace of mind. Here are some popular choices: <!-- /wp:paragraph -->  <!-- wp:list --> <ul class="wp-block-list"><!-- wp:list-item --> <li><strong>Ring Indoor/Outdoor Cameras</strong><strong>Pros</strong>: Simple installation, good video quality, and Alexa integration; options for battery or wired power.<strong>Cons</strong>: Requires a subscription for video storage and relies on cloud storage, raising privacy concerns.<strong>Price</strong>: Ranges from60-200.<strong>Setup Difficulty</strong>: Beginner-friendly, typically plug-and-play.</li> <!-- /wp:list-item -->  <!-- wp:list-item --> <li><strong>Arlo Pro 4 Camera</strong><strong>Pros</strong>: High-definition video with color night vision, good battery life, and compatibility with major platforms.<strong>Cons</strong>: Expensive, and requires a subscription for cloud storage.<strong>Price</strong>: Around200 per camera.
      Setup Difficulty: Moderate; requires good Wi-Fi coverage for best performance.
    • DIY Security Camera with Raspberry Pi and openHAB
      Pros: Cost-effective, customizable, with local storage options, and integration with openHAB for full automation.
      Cons: Requires assembly and configuration, lower video quality than commercial options, and longer setup and configuration time.
      Price: Approximately 40 for parts.<strong>Setup Difficulty</strong>: Learning curve and longer setup; assembly and openHAB integration are required.</li> <!-- /wp:list-item --></ul> <!-- /wp:list -->  <!-- wp:paragraph --> <strong>Security Cameras and Motion Sensors Comparison Table</strong> <!-- /wp:paragraph -->  <!-- wp:table --> <figure class="wp-block-table"><table class="has-fixed-layout"><thead><tr><th><strong>Device</strong></th><th><strong>Pros</strong></th><th><strong>Cons</strong></th><th><strong>Price</strong></th><th><strong>Setup Difficulty</strong></th></tr></thead><tbody><tr><td>Ring Cameras</td><td>Easy setup, good video quality</td><td>Subscription needed</td><td>60-200</td><td>Easy</td></tr><tr><td>Arlo Pro 4</td><td>Excellent video, long battery life</td><td>Expensive,</td><td></td><td></td></tr></tbody></table></figure> <!-- /wp:table -->  <!-- wp:paragraph --> needs subscription |200 | Moderate |
      | DIY Raspberry Pi Camera | Customizable, budget-friendly, openHAB compatible | Setup time, learning curve | 40 | Learning curve, longer setup | <!-- /wp:paragraph -->  <!-- wp:heading {"level":4} --> <h4 class="wp-block-heading"><strong>Voice Assistants and Smart Speakers</strong></h4> <!-- /wp:heading -->  <!-- wp:paragraph --> Voice assistants allow hands-free control of smart home devices, responding to voice commands and providing other functionalities. Here are popular options: <!-- /wp:paragraph -->  <!-- wp:list --> <ul class="wp-block-list"><!-- wp:list-item --> <li><strong>Amazon Echo</strong><strong>Pros</strong>: Voice control via Alexa, good sound quality, and compatible with many smart home devices.<strong>Cons</strong>: Limited to Alexa-compatible devices, some features require internet connectivity.<strong>Price</strong>: Around80.
      Setup Difficulty: Very beginner-friendly; quick setup via Alexa app.
    • Google Nest Audio
      Pros: High-quality sound, excellent integration with Google services, and responsive to natural language commands.
      Cons: Limited to Google ecosystem, requires Wi-Fi for functionality.
      Price: Approximately 100.<strong>Setup Difficulty</strong>: Very easy; setup through Google Home app.</li> <!-- /wp:list-item -->  <!-- wp:list-item --> <li><strong>DIY Smart Speaker with Raspberry Pi and openHAB Integration</strong><strong>Pros</strong>: Customizable, privacy-focused, with local control that doesn't rely on constant internet access.<strong>Cons</strong>: Limited functionality compared to commercial speakers, requires programming knowledge and configuration time with openHAB.<strong>Price</strong>: Around50.

      Setup Difficulty: Learning curve and longer setup; requires openHAB integration and assembly.
    • Voice Assistants and Smart Speakers Comparison Table

      DeviceProsConsPriceSetup Difficulty
      Amazon EchoEasy setup, broad compatibilityAlexa ecosystem limitations80</td><td>Very easy</td></tr><tr><td>Google Nest Audio</td><td>Excellent sound, Google integration</td><td>Limited to Google ecosystem</td><td>100Very easy
      DIY Speaker (Raspberry Pi)Customizable, privacy-focusedSetup time, limited features50</td><td>Learning curve, longer setup</td></tr></tbody></table></figure> <!-- /wp:table -->  <!-- wp:separator --> <hr class="wp-block-separator has-alpha-channel-opacity"/> <!-- /wp:separator -->  <!-- wp:heading {"level":4} --> <h4 class="wp-block-heading">Conclusion: Best Choices for Commercially Available and DIY Solutions</h4> <!-- /wp:heading -->  <!-- wp:list --> <ul class="wp-block-list"><!-- wp:list-item --> <li><strong>Best Commercially Available Options</strong>: The <strong>Samsung SmartThings Hub</strong> for versatile device control, <strong>Philips Hue</strong> for reliable and customizable smart lighting, <strong>Ring Cameras</strong> for effective home security, and the <strong>Amazon Echo</strong> for voice control. These devices are beginner-friendly, offering simple setup and excellent functionality.</li> <!-- /wp:list-item -->  <!-- wp:list-item --> <li><strong>Best DIY Solutions</strong>: For tech-savvy users, a <strong>DIY hub with Raspberry Pi and openHAB</strong> provides flexibility, privacy, and local control. <strong>ESP8266 LED strips</strong> offer affordable, customizable lighting, and <strong>DIY Raspberry Pi Cameras</strong> provide budget-friendly security. For privacy-conscious voice control, a <strong>DIY Raspberry Pi Smart Speaker</strong> integrated with openHAB is an ideal solution, offering flexibility with the support of an active community to guide you.</li> <!-- /wp:list-item --></ul> <!-- /wp:list -->  <!-- wp:separator --> <hr class="wp-block-separator has-alpha-channel-opacity"/> <!-- /wp:separator -->  <!-- wp:heading {"level":3} --> <h3 class="wp-block-heading">7. <strong>Setting Up Automation and Routines</strong></h3> <!-- /wp:heading -->  <!-- wp:paragraph --> Creating automation routines is one of the most exciting aspects of a smart home, allowing you to enhance convenience, security, and energy efficiency. Automations make your smart home devices work together seamlessly, performing tasks automatically based on specific conditions. This part covers the basics of automation, provides examples of beginner routines, and demonstrates how to integrate multiple devices effectively. For more ideas and guidance on setting up routines, <strong>SensorPoweredHome.com</strong> is a great resource, offering tips and inspiration for beginners and advanced users alike. <!-- /wp:paragraph -->  <!-- wp:heading {"level":4} --> <h4 class="wp-block-heading"><strong>Understanding Automation Basics</strong></h4> <!-- /wp:heading -->  <!-- wp:paragraph --> Smart home automation is based on three fundamental elements: <strong>triggers</strong>, <strong>conditions</strong>, and <strong>actions</strong>. <!-- /wp:paragraph -->  <!-- wp:list --> <ul class="wp-block-list"><!-- wp:list-item --> <li><strong>Triggers</strong>: A trigger is the event that initiates an automation. Examples of triggers include a motion sensor detecting movement, a specific time of day, or even a command from a voice assistant.</li> <!-- /wp:list-item -->  <!-- wp:list-item --> <li><strong>Conditions</strong>: Conditions are optional filters that must be met for the automation to proceed. For instance, you might only want the lights to turn on if it's after sunset or only activate heating if the temperature is below a certain level.</li> <!-- /wp:list-item -->  <!-- wp:list-item --> <li><strong>Actions</strong>: Actions are the tasks that the automation performs once the trigger and conditions are met. Common actions include turning on lights, adjusting the thermostat, locking doors, or starting a coffee maker.</li> <!-- /wp:list-item --></ul> <!-- /wp:list -->  <!-- wp:paragraph --> These elements allow you to design automations that fit your daily routines and make your home more responsive and efficient. <!-- /wp:paragraph -->  <!-- wp:uagb/image {"block_id":"566565b8","url":"https://sensorpoweredhome.com/wp-content/uploads/2024/11/Fundamental-routine-flowchart@0.25x-1024x209.png","urlTablet":"https://sensorpoweredhome.com/wp-content/uploads/2024/11/Fundamental-routine-flowchart@0.25x.png","urlMobile":"https://sensorpoweredhome.com/wp-content/uploads/2024/11/Fundamental-routine-flowchart@0.25x.png","alt":"Flowchart illustrating the basic routine process in smart home automation, guiding users through setting up smart home devices with triggers, conditions, and actions. It begins with a 'Trigger' (e.g., motion detected or scheduled time), checks if specific 'Conditions' are present, evaluates them, and then decides if the conditions are met. If so, the system proceeds to 'Execute Actions' (e.g., turn on lights), otherwise, it 'Does Nothing.' A practical guide for beginners and DIY smart home enthusiasts to understand and implement automated routines in their home automation setups.","id":2654,"linkDestination":"none","title":"Fundamental routine flowchart@0.25x","naturalWidth":1668,"naturalHeight":341,"sizeSlug":"large","sizeSlugTablet":"large","sizeSlugMobile":"large"} --> <div class="wp-block-uagb-image uagb-block-566565b8 wp-block-uagb-image--layout-default wp-block-uagb-image--effect-static wp-block-uagb-image--align-none"><figure class="wp-block-uagb-image__figure"><img srcset="https://sensorpoweredhome.com/wp-content/uploads/2024/11/Fundamental-routine-flowchart@0.25x-1024x209.png ,https://sensorpoweredhome.com/wp-content/uploads/2024/11/Fundamental-routine-flowchart@0.25x.png 780w, https://sensorpoweredhome.com/wp-content/uploads/2024/11/Fundamental-routine-flowchart@0.25x.png 360w" sizes="(max-width: 480px) 150px" src="https://sensorpoweredhome.com/wp-content/uploads/2024/11/Fundamental-routine-flowchart@0.25x-1024x209.png" alt="Flowchart illustrating the basic routine process in smart home automation, guiding users through setting up smart home devices with triggers, conditions, and actions. It begins with a 'Trigger' (e.g., motion detected or scheduled time), checks if specific 'Conditions' are present, evaluates them, and then decides if the conditions are met. If so, the system proceeds to 'Execute Actions' (e.g., turn on lights), otherwise, it 'Does Nothing.' A practical guide for beginners and DIY smart home enthusiasts to understand and implement automated routines in their home automation setups." class="uag-image-2654" width="1668" height="341" title="Fundamental routine flowchart@0.25x" loading="lazy" role="img"/></figure></div> <!-- /wp:uagb/image -->  <!-- wp:heading {"level":4} --> <h4 class="wp-block-heading"><strong>Example Routines for Beginners</strong></h4> <!-- /wp:heading -->  <!-- wp:paragraph --> Here are three beginner-friendly routines to add comfort, security, and energy savings to your smart home. These routines are a great starting point for learning how to coordinate smart devices effectively. <!-- /wp:paragraph -->  <!-- wp:heading {"level":5} --> <h5 class="wp-block-heading"><strong>1. Morning Routine</strong></h5> <!-- /wp:heading -->  <!-- wp:paragraph --> A morning routine can help start the day off smoothly by automating your wake-up process. This routine might turn on the lights, start the coffee maker, and adjust the thermostat to a comfortable temperature. <!-- /wp:paragraph -->  <!-- wp:list --> <ul class="wp-block-list"><!-- wp:list-item --> <li><strong>Trigger</strong>: Set to activate at a specific time each morning, such as 6:30 AM.</li> <!-- /wp:list-item -->  <!-- wp:list-item --> <li><strong>Actions</strong>:</li> <!-- /wp:list-item --></ul> <!-- /wp:list -->  <!-- wp:list {"ordered":true} --> <ol class="wp-block-list"><!-- wp:list-item --> <li>Turn on the bedroom and bathroom lights.</li> <!-- /wp:list-item -->  <!-- wp:list-item --> <li>Start the coffee maker in the kitchen.</li> <!-- /wp:list-item -->  <!-- wp:list-item --> <li>Adjust the thermostat to a comfortable morning temperature, like 72°F.</li> <!-- /wp:list-item --></ol> <!-- /wp:list -->  <!-- wp:paragraph --> This routine creates a welcoming start to the day by ensuring your environment is ready before you even get out of bed. <!-- /wp:paragraph -->  <!-- wp:heading {"level":5} --> <h5 class="wp-block-heading"><strong>2. Evening Security Routine</strong></h5> <!-- /wp:heading -->  <!-- wp:paragraph --> An evening security routine helps ensure that your home is secure before bedtime. It can automatically lock doors, turn on outdoor lights, and activate security cameras, providing peace of mind without the need for manual checks. <!-- /wp:paragraph -->  <!-- wp:list --> <ul class="wp-block-list"><!-- wp:list-item --> <li><strong>Trigger</strong>: Time-based, set to activate at sunset or a specific time in the evening, like 9:00 PM.</li> <!-- /wp:list-item -->  <!-- wp:list-item --> <li><strong>Actions</strong>:</li> <!-- /wp:list-item --></ul> <!-- /wp:list -->  <!-- wp:list {"ordered":true} --> <ol class="wp-block-list"><!-- wp:list-item --> <li>Lock all doors.</li> <!-- /wp:list-item -->  <!-- wp:list-item --> <li>Turn on outdoor lights.</li> <!-- /wp:list-item -->  <!-- wp:list-item --> <li>Arm the security cameras for nighttime monitoring.</li> <!-- /wp:list-item --></ol> <!-- /wp:list -->  <!-- wp:paragraph --> This routine reinforces home security by automating essential tasks, allowing you to focus on unwinding for the evening. <!-- /wp:paragraph -->  <!-- wp:heading {"level":5} --> <h5 class="wp-block-heading"><strong>3. Energy-Saving Routine</strong></h5> <!-- /wp:heading -->  <!-- wp:paragraph --> An energy-saving routine optimizes your home's energy use when it's empty, saving money on utilities. For example, this routine could turn off unnecessary lights and reduce the thermostat setting if the home is vacant. <!-- /wp:paragraph -->  <!-- wp:list --> <ul class="wp-block-list"><!-- wp:list-item --> <li><strong>Trigger</strong>: Motion sensors detect no activity for a set period, such as 30 minutes.</li> <!-- /wp:list-item -->  <!-- wp:list-item --> <li><strong>Conditions</strong>: Only activates during daylight hours (optional).</li> <!-- /wp:list-item -->  <!-- wp:list-item --> <li><strong>Actions</strong>:</li> <!-- /wp:list-item --></ul> <!-- /wp:list -->  <!-- wp:list {"ordered":true} --> <ol class="wp-block-list"><!-- wp:list-item --> <li>Turn off all lights to reduce electricity consumption.</li> <!-- /wp:list-item -->  <!-- wp:list-item --> <li>Set the thermostat to an eco-friendly temperature or lower the heating to conserve energy.</li> <!-- /wp:list-item --></ol> <!-- /wp:list -->  <!-- wp:paragraph --> This routine is ideal for ensuring you're not wasting energy during the day, especially if you're out of the house for extended periods. <!-- /wp:paragraph -->  <!-- wp:heading {"level":4} --> <h4 class="wp-block-heading"><strong>Examples of Integrating Multiple Devices in Automations</strong></h4> <!-- /wp:heading -->  <!-- wp:paragraph --> Integrating multiple devices into a single automation sequence creates a more dynamic and functional smart home. Here are three examples that illustrate the power of multi-device automations: <!-- /wp:paragraph -->  <!-- wp:heading {"level":5} --> <h5 class="wp-block-heading"><strong>1. Motion Sensors Activating Lights</strong></h5> <!-- /wp:heading -->  <!-- wp:paragraph --> For convenience and energy savings, you can use motion sensors to control lighting. For instance, setting up a hallway motion sensor to automatically turn on lights when someone walks through can prevent unnecessary lighting use. <!-- /wp:paragraph -->  <!-- wp:list --> <ul class="wp-block-list"><!-- wp:list-item --> <li><strong>Trigger</strong>: Motion detected in the hallway.</li> <!-- /wp:list-item -->  <!-- wp:list-item --> <li><strong>Condition</strong>: Activates only if it's after sunset.</li> <!-- /wp:list-item -->  <!-- wp:list-item --> <li><strong>Action</strong>: Turns on hallway lights.</li> <!-- /wp:list-item --></ul> <!-- /wp:list -->  <!-- wp:paragraph --> This automation is perfect for areas like entryways and hallways, where lights only need to be on briefly. <!-- /wp:paragraph -->  <!-- wp:heading {"level":5} --> <h5 class="wp-block-heading"><strong>2. Thermostat Adjusting Based on Occupancy</strong></h5> <!-- /wp:heading -->  <!-- wp:paragraph --> Save energy by programming the thermostat to adjust according to occupancy. For example, when the front door opens, the thermostat can automatically adjust to a comfortable temperature, ensuring your home is ready when you arrive. <!-- /wp:paragraph -->  <!-- wp:list --> <ul class="wp-block-list"><!-- wp:list-item --> <li><strong>Trigger</strong>: The front door sensor detects that the door is opened.</li> <!-- /wp:list-item -->  <!-- wp:list-item --> <li><strong>Condition</strong>: Activates only if the thermostat is set to away mode.</li> <!-- /wp:list-item -->  <!-- wp:list-item --> <li><strong>Action</strong>: Adjusts the thermostat to home mode, such as 72°F.</li> <!-- /wp:list-item --></ul> <!-- /wp:list -->  <!-- wp:paragraph --> This automation ensures that your home is warm or cool as needed, reducing energy use while you're away and maximizing comfort when you return. <!-- /wp:paragraph -->  <!-- wp:heading {"level":5} --> <h5 class="wp-block-heading"><strong>3. Outdoor Cameras Triggering Lights</strong></h5> <!-- /wp:heading -->  <!-- wp:paragraph --> Enhance security by connecting outdoor cameras with motion sensors to floodlights. If the camera detects movement, the floodlights can turn on to illuminate the area, potentially deterring intruders. <!-- /wp:paragraph -->  <!-- wp:list --> <ul class="wp-block-list"><!-- wp:list-item --> <li><strong>Trigger</strong>: Motion detected by an outdoor security camera.</li> <!-- /wp:list-item -->  <!-- wp:list-item --> <li><strong>Condition</strong>: Only activates if it's after sunset.</li> <!-- /wp:list-item -->  <!-- wp:list-item --> <li><strong>Action</strong>: Turns on outdoor floodlights.</li> <!-- /wp:list-item --></ul> <!-- /wp:list -->  <!-- wp:paragraph --> This setup is especially useful in backyards or driveways, adding an extra layer of security and visibility in low-light conditions. <!-- /wp:paragraph -->  <!-- wp:separator --> <hr class="wp-block-separator has-alpha-channel-opacity"/> <!-- /wp:separator -->  <!-- wp:paragraph --> Here's an extended text for <strong>Part 8</strong> with a focus on troubleshooting common smart home issues, the importance of updates, and best practices for device security. <!-- /wp:paragraph -->  <!-- wp:separator --> <hr class="wp-block-separator has-alpha-channel-opacity"/> <!-- /wp:separator -->  <!-- wp:heading {"level":3} --> <h3 class="wp-block-heading">8. <strong>Maintaining and Troubleshooting Your Smart Home</strong></h3> <!-- /wp:heading -->  <!-- wp:paragraph --> Smart home systems can simplify daily life and enhance comfort, but they also require regular maintenance and troubleshooting to ensure smooth operation. In this section, we'll explore common issues that can arise, the importance of keeping firmware and software up to date, and essential practices for maintaining device security. <!-- /wp:paragraph -->  <!-- wp:heading {"level":4} --> <h4 class="wp-block-heading"><strong>Common Smart Home Issues</strong></h4> <!-- /wp:heading -->  <!-- wp:paragraph --> Despite their convenience, smart home systems occasionally face connectivity issues, device lag, or routine failures. Here's a guide to troubleshooting these common issues and restoring smooth operation. <!-- /wp:paragraph -->  <!-- wp:list --> <ul class="wp-block-list"><!-- wp:list-item --> <li><strong>Connectivity Problems</strong>Smart home devices rely on stable Wi-Fi or other communication protocols (e.g., Zigbee or Z-Wave). Connectivity problems can disrupt routines, cause delayed responses, or prevent devices from functioning altogether.<strong>Solution</strong>:</li> <!-- /wp:list-item -->  <!-- wp:list-item --> <li><strong>Check your router's settings</strong> and ensure it's set to broadcast both 2.4 GHz and 5 GHz bands, as many smart home devices only connect to the 2.4 GHz band.</li> <!-- /wp:list-item -->  <!-- wp:list-item --> <li><strong>Restart the router</strong> and the affected devices. This often resolves temporary issues.</li> <!-- /wp:list-item -->  <!-- wp:list-item --> <li><strong>Position the router centrally</strong> or consider using a mesh Wi-Fi system to extend coverage and reduce dead zones.For detailed guidance, see this resource on Wi-Fi setup for smart homes: <a href="https://support.google.com/googlenest/answer/6246450?hl=en">Nest Wi-Fi Setup Guide</a>.</li> <!-- /wp:list-item -->  <!-- wp:list-item --> <li><strong>Device Lag</strong>Device lag is another common issue, especially in systems with many connected devices. Lag may cause delays between issuing commands and the devices' responses, making the smart home feel less responsive.<strong>Solution</strong>:</li> <!-- /wp:list-item -->  <!-- wp:list-item --> <li><strong>Limit the number of simultaneous device connections</strong> by segmenting your network or using multiple routers.</li> <!-- /wp:list-item -->  <!-- wp:list-item --> <li><strong>Prioritize bandwidth for essential devices</strong> and close background apps that might be consuming network resources.</li> <!-- /wp:list-item -->  <!-- wp:list-item --> <li><strong>Check for network congestion</strong> by running a speed test to see if your internet speed supports your smart home setup. Tools like <a href="https://www.speedtest.net/">Speedtest</a> can help assess your network's performance.</li> <!-- /wp:list-item -->  <!-- wp:list-item --> <li><strong>Routine Failures</strong>Automations or routines may occasionally fail due to outdated software, poor connectivity, or misconfigured rules.<strong>Solution</strong>:</li> <!-- /wp:list-item -->  <!-- wp:list-item --> <li><strong>Check routine configurations</strong> to ensure triggers, conditions, and actions are set correctly. For example, ensure time-based routines align with your time zone settings.</li> <!-- /wp:list-item -->  <!-- wp:list-item --> <li><strong>Update firmware and apps</strong> for your smart home devices and control hub, as updates often fix bugs that can disrupt routines.</li> <!-- /wp:list-item -->  <!-- wp:list-item --> <li><strong>Test individual devices</strong> manually to confirm each component works independently before re-testing the routine. For example, confirm that a motion sensor and light can each work independently before re-checking a motion-activated lighting routine.</li> <!-- /wp:list-item --></ul> <!-- /wp:list -->  <!-- wp:paragraph --> For additional troubleshooting resources, <strong>SensorPoweredHome.com</strong> offers valuable tips on setting up and maintaining smart home routines to minimize issues. <!-- /wp:paragraph -->  <!-- wp:heading {"level":4} --> <h4 class="wp-block-heading"><strong>Firmware and Software Updates</strong></h4> <!-- /wp:heading -->  <!-- wp:paragraph --> Keeping your smart home devices up to date is crucial for maintaining functionality, security, and compatibility with other devices. Firmware and software updates provide bug fixes, enhance performance, and introduce new features, making your devices more reliable and secure. <!-- /wp:paragraph -->  <!-- wp:list --> <ul class="wp-block-list"><!-- wp:list-item --> <li><strong>Automatic Updates</strong>: Some smart home ecosystems, such as Apple HomeKit, Google Nest, and Amazon Alexa, offer automatic updates, reducing the need for manual intervention. However, it's essential to enable automatic updates in each device's settings.</li> <!-- /wp:list-item -->  <!-- wp:list-item --> <li><strong>Manual Updates</strong>: Many devices require manual firmware updates, which typically need to be installed via the device's app or web portal. For example:</li> <!-- /wp:list-item -->  <!-- wp:list-item --> <li><strong>Philips Hue</strong> updates can be installed via the <strong>Philips Hue app</strong> under the ``Settings'' section, ensuring your lights work with the latest features.</li> <!-- /wp:list-item -->  <!-- wp:list-item --> <li>For <strong>openHAB</strong>, you can check for the latest version on their <a href="https://www.openhab.org/download/">update page</a> and follow the detailed instructions for installing updates.</li> <!-- /wp:list-item -->  <!-- wp:list-item --> <li><strong>Firmware Release Notes</strong>: When possible, read the firmware release notes on the manufacturer's website. These notes outline new features, fixes, and potential compatibility issues, helping you decide when and how to update your devices.</li> <!-- /wp:list-item --></ul> <!-- /wp:list -->  <!-- wp:paragraph --> Regularly updating your devices not only enhances performance but also mitigates potential security risks. Many companies release security patches in firmware updates, which address vulnerabilities that hackers might exploit. By staying current with updates, you're ensuring your smart home remains secure and functional. <!-- /wp:paragraph -->  <!-- wp:heading {"level":4} --> <h4 class="wp-block-heading"><strong>Ensuring Device Security</strong></h4> <!-- /wp:heading -->  <!-- wp:paragraph --> Smart home devices are vulnerable to cyber threats, which can compromise personal data and even provide unauthorized access to your home network. Implementing strong security measures is essential for safeguarding your devices and protecting your privacy. <!-- /wp:paragraph -->  <!-- wp:list --> <ul class="wp-block-list"><!-- wp:list-item --> <li><strong>Use Strong, Unique Passwords</strong>: Set a unique password for each smart home account and device, especially for those accessible from mobile apps or the internet. Avoid default passwords, which are easier to hack. A password manager like <a href="https://www.lastpass.com/">LastPass</a> can help you generate and securely store complex passwords.</li> <!-- /wp:list-item -->  <!-- wp:list-item --> <li><strong>Enable Two-Factor Authentication (2FA)</strong>: Where available, enable 2FA for smart home accounts. This adds an extra layer of security, requiring a second verification step (such as a code sent to your phone) to access your account. Services like <strong>Google Nest</strong> and <strong>Amazon Alexa</strong> support 2FA, which you can enable in your account settings.</li> <!-- /wp:list-item -->  <!-- wp:list-item --> <li><strong>Network Segmentation</strong>: Segmenting your network by placing smart home devices on a separate network or VLAN (Virtual Local Area Network) can enhance security. This approach isolates IoT devices from primary devices like computers and phones, reducing the risk of unauthorized access. Many routers support guest networks or VLANs that you can set up through the router's web interface. For more on configuring VLANs, check your router's user guide or see this <a href="https://www.tp-link.com/us/support/faq/2717/">VLAN setup guide</a>.</li> <!-- /wp:list-item -->  <!-- wp:list-item --> <li><strong>Disable Unnecessary Features</strong>: Many devices come with features like Universal Plug and Play (UPnP) or remote access enabled by default. Disabling these features if they're not needed reduces potential entry points for hackers. For example, UPnP can be turned off in your router's settings, which can enhance security without significantly impacting device performance.</li> <!-- /wp:list-item -->  <!-- wp:list-item --> <li><strong>Monitor Device Activity</strong>: Regularly check for unusual activity, such as unexpected changes in device status or logs indicating remote access attempts. Some devices and hubs provide logs of recent activities, which can help you monitor for anything suspicious.</li> <!-- /wp:list-item -->  <!-- wp:list-item --> <li><strong>Keep Devices Offline When Not Needed</strong>: For smart home devices that don't require constant internet connectivity, consider disconnecting them when not in use. Some devices, like security cameras or smart speakers, can work on a local network without internet access, reducing exposure to online threats.</li> <!-- /wp:list-item --></ul> <!-- /wp:list -->  <!-- wp:paragraph --> By implementing these security measures, you can create a safer, more resilient smart home environment. Smart home manufacturers and device forums also provide security resources, so regularly consult these to stay updated on best practices. For additional guidance, <strong>SensorPoweredHome.com</strong> offers detailed articles on smart home security, helping you protect your devices from emerging threats. <!-- /wp:paragraph -->  <!-- wp:separator --> <hr class="wp-block-separator has-alpha-channel-opacity"/> <!-- /wp:separator -->  <!-- wp:heading {"level":3} --> <h3 class="wp-block-heading">9. <strong>Expanding Your Smart Home System</strong></h3> <!-- /wp:heading -->  <!-- wp:paragraph --> As you become more comfortable with your smart home, you may want to expand its capabilities by adding new devices, integrating DIY components, and optimizing routines for different seasons. This section provides tips for upgrading and scaling your system, explains the role of MQTT in DIY solutions, and offers seasonal automation ideas to improve comfort, energy efficiency, and convenience. <!-- /wp:paragraph -->  <!-- wp:heading {"level":4} --> <h4 class="wp-block-heading"><strong>Upgrading and Adding New Devices</strong></h4> <!-- /wp:heading -->  <!-- wp:paragraph --> Smart home technology is rapidly advancing, with new devices offering improved features and capabilities. Here are some tips for scaling your system as your needs grow: <!-- /wp:paragraph -->  <!-- wp:list --> <ul class="wp-block-list"><!-- wp:list-item --> <li><strong>Assess Compatibility</strong>: Ensure that any new devices are compatible with your current smart home ecosystem, whether you use Amazon Alexa, Google Assistant, Apple HomeKit, or open-source platforms like openHAB. This compatibility will ensure smooth device communication and integration into your automation routines.</li> <!-- /wp:list-item -->  <!-- wp:list-item --> <li><strong>Prioritize Core Functionalities First</strong>: Begin with devices that address essential needs, such as security, lighting, and climate control, before adding more specialized items. This foundation makes scaling easier as you add more advanced devices.</li> <!-- /wp:list-item -->  <!-- wp:list-item --> <li><strong>Use Hubs and Bridges</strong>: Hubs like the Philips Hue Bridge for lighting or Samsung SmartThings for multi-protocol support allow you to control more devices through a single app, making management easier as you add devices.</li> <!-- /wp:list-item -->  <!-- wp:list-item --> <li><strong>Consider Mesh Wi-Fi for Better Connectivity</strong>: With more devices, your Wi-Fi network can become strained. Mesh Wi-Fi systems, like Google Nest Wi-Fi or Eero, distribute connectivity across the home, improving performance and preventing connectivity drops as your system grows.</li> <!-- /wp:list-item -->  <!-- wp:list-item --> <li><strong>Explore Advanced Integrations</strong>: Once you have a solid setup, consider adding devices like energy monitors, water leak sensors, or air quality monitors. These additions can increase safety, reduce costs, and provide valuable data insights for future improvements.</li> <!-- /wp:list-item --></ul> <!-- /wp:list -->  <!-- wp:paragraph --> By scaling your system thoughtfully and maintaining compatibility, you can build a responsive, efficient smart home that adapts to your evolving needs. <!-- /wp:paragraph -->  <!-- wp:heading {"level":4} --> <h4 class="wp-block-heading"><strong>Using MQTT for DIY Smart Home Scalability</strong></h4> <!-- /wp:heading -->  <!-- wp:paragraph --> MQTT (Message Queuing Telemetry Transport) is a lightweight messaging protocol that facilitates efficient communication between devices. It's particularly popular in DIY smart home setups because it provides flexibility and scalability for large or complex systems. MQTT enables devices to communicate over a central server (broker), reducing bandwidth and improving response times. <!-- /wp:paragraph -->  <!-- wp:paragraph --> For DIY enthusiasts, MQTT is ideal due to its open-source nature, low-bandwidth requirements, and adaptability. By configuring devices to publish and subscribe to topics managed by the MQTT broker, you can easily add new devices and maintain compatibility across different hardware. <!-- /wp:paragraph -->  <!-- wp:paragraph --> To learn more about setting up MQTT in your smart home, visit this related article: <a href="https://sensorpoweredhome.com/mqtt-iot-smart-home-automation">What is MQTT and Why is it Important for IoT in Home Automation?</a>. <!-- /wp:paragraph -->  <!-- wp:heading {"level":4} --> <h4 class="wp-block-heading"><strong>Making Smart Home Adjustments for Different Seasons</strong></h4> <!-- /wp:heading -->  <!-- wp:paragraph --> Seasonal changes impact indoor comfort needs, energy usage, and security considerations. Here are five examples of seasonal smart home adjustments, each with an example algorithm to help implement effective automations. <!-- /wp:paragraph -->  <!-- wp:heading {"level":5} --> <h5 class="wp-block-heading"><strong>1. Winter Heating Adjustment</strong></h5> <!-- /wp:heading -->  <!-- wp:paragraph --> In winter, a smart thermostat can help maintain comfort while optimizing energy use. Automating temperature adjustments based on occupancy and time can reduce unnecessary heating. <!-- /wp:paragraph -->  <!-- wp:list --> <ul class="wp-block-list"><!-- wp:list-item --> <li><strong>Algorithm</strong>:</li> <!-- /wp:list-item -->  <!-- wp:list-item --> <li><strong>Trigger</strong>: Occupancy detected (via motion sensor) and time is between 6:00 AM and 10:00 PM.</li> <!-- /wp:list-item -->  <!-- wp:list-item --> <li><strong>Condition</strong>: Temperature is below 68°F (20°C).</li> <!-- /wp:list-item -->  <!-- wp:list-item --> <li><strong>Action</strong>: Set thermostat to 72°F (22°C) if occupied; otherwise, set to 65°F (18°C) to maintain a lower base temperature.</li> <!-- /wp:list-item --></ul> <!-- /wp:list -->  <!-- wp:paragraph --> This routine ensures warmth during active hours while saving energy during unoccupied periods. <!-- /wp:paragraph -->  <!-- wp:heading {"level":5} --> <h5 class="wp-block-heading"><strong>2. Summer Cooling and Humidity Control</strong></h5> <!-- /wp:heading -->  <!-- wp:paragraph --> In summer, high temperatures and humidity can create discomfort. A smart thermostat and humidity sensor can work together to keep rooms cool and comfortable. <!-- /wp:paragraph -->  <!-- wp:list --> <ul class="wp-block-list"><!-- wp:list-item --> <li><strong>Algorithm</strong>:</li> <!-- /wp:list-item -->  <!-- wp:list-item --> <li><strong>Trigger</strong>: Temperature exceeds 76°F (24°C) or humidity exceeds 60%.</li> <!-- /wp:list-item -->  <!-- wp:list-item --> <li><strong>Condition</strong>: Time is between 12:00 PM and 8:00 PM.</li> <!-- /wp:list-item -->  <!-- wp:list-item --> <li><strong>Action</strong>: Set thermostat to 72°F (22°C) and activate the dehumidifier if humidity is high.</li> <!-- /wp:list-item --></ul> <!-- /wp:list -->  <!-- wp:paragraph --> This setup reduces both temperature and humidity during peak hours, maintaining comfort in warm conditions. <!-- /wp:paragraph -->  <!-- wp:heading {"level":5} --> <h5 class="wp-block-heading"><strong>3. Spring and Fall Ventilation Routine</strong></h5> <!-- /wp:heading -->  <!-- wp:paragraph --> During mild seasons, ventilation can maintain indoor air quality without relying heavily on HVAC systems. Window sensors and a smart fan can help bring in fresh air when conditions are favorable. <!-- /wp:paragraph -->  <!-- wp:list --> <ul class="wp-block-list"><!-- wp:list-item --> <li><strong>Algorithm</strong>:</li> <!-- /wp:list-item -->  <!-- wp:list-item --> <li><strong>Trigger</strong>: Indoor temperature is between 65°F (18°C) and 75°F (24°C), outdoor air quality is good (using an outdoor air quality sensor).</li> <!-- /wp:list-item -->  <!-- wp:list-item --> <li><strong>Condition</strong>: Window sensor detects that windows are open.</li> <!-- /wp:list-item -->  <!-- wp:list-item --> <li><strong>Action</strong>: Turn on the smart fan to increase airflow without activating the HVAC system.</li> <!-- /wp:list-item --></ul> <!-- /wp:list -->  <!-- wp:paragraph --> This ventilation routine refreshes indoor air naturally, saving energy and improving air quality. <!-- /wp:paragraph -->  <!-- wp:heading {"level":5} --> <h5 class="wp-block-heading"><strong>4. Autumn Leaf Detection and Gutter Heating</strong></h5> <!-- /wp:heading -->  <!-- wp:paragraph --> In regions with heavy autumn leaves, gutter clogs can cause water damage. A smart camera with object detection can identify leaf build-up, while a gutter heating element can melt early snow and prevent blockages. <!-- /wp:paragraph -->  <!-- wp:list --> <ul class="wp-block-list"><!-- wp:list-item --> <li><strong>Algorithm</strong>:</li> <!-- /wp:list-item -->  <!-- wp:list-item --> <li><strong>Trigger</strong>: Smart camera detects leaves in gutters (through object detection software).</li> <!-- /wp:list-item -->  <!-- wp:list-item --> <li><strong>Condition</strong>: Rain or snow forecast within 24 hours.</li> <!-- /wp:list-item -->  <!-- wp:list-item --> <li><strong>Action</strong>: Activate gutter heating element to melt snow and clear debris.</li> <!-- /wp:list-item --></ul> <!-- /wp:list -->  <!-- wp:paragraph --> Automating gutter maintenance in this way prevents clogs and reduces water damage risk in rainy or snowy weather. <!-- /wp:paragraph -->  <!-- wp:heading {"level":5} --> <h5 class="wp-block-heading"><strong>5. Holiday Lighting for Winter Festivities</strong></h5> <!-- /wp:heading -->  <!-- wp:paragraph --> Seasonal lights can be automated to create a festive atmosphere, saving time by setting up a schedule with outdoor smart plugs. Lights can turn on based on specific dates or at sunset. <!-- /wp:paragraph -->  <!-- wp:list --> <ul class="wp-block-list"><!-- wp:list-item --> <li><strong>Algorithm</strong>:</li> <!-- /wp:list-item -->  <!-- wp:list-item --> <li><strong>Trigger</strong>: Date is between December 1 and January 5, or time is sunset.</li> <!-- /wp:list-item -->  <!-- wp:list-item --> <li><strong>Condition</strong>: Outdoor lights are off.</li> <!-- /wp:list-item -->  <!-- wp:list-item --> <li><strong>Action</strong>: Turn on holiday lights from sunset until 11:00 PM.</li> <!-- /wp:list-item --></ul> <!-- /wp:list -->  <!-- wp:paragraph --> This routine enhances holiday decor by automatically managing holiday lights each evening and turning them off to conserve energy. <!-- /wp:paragraph -->  <!-- wp:paragraph --> By adjusting your smart home system for seasonal needs, you can maximize comfort, reduce energy costs, and tailor your home environment to the unique requirements of each season. <!-- /wp:paragraph -->  <!-- wp:separator --> <hr class="wp-block-separator has-alpha-channel-opacity"/> <!-- /wp:separator -->  <!-- wp:heading {"level":3} --> <h3 class="wp-block-heading">10. <strong>Best Practices and Tips for Smart Home Beginners</strong></h3> <!-- /wp:heading -->  <!-- wp:paragraph --> Embarking on a smart home journey can be both exciting and challenging. A well-planned approach can help you avoid common pitfalls and make the experience enjoyable and rewarding. By setting realistic expectations, embracing gradual improvements, and tapping into helpful resources, you can build a smart home system that fits your lifestyle and grows with your needs. <!-- /wp:paragraph -->  <!-- wp:heading {"level":4} --> <h4 class="wp-block-heading"><strong>Leveraging Open-Source Platforms for Customization</strong></h4> <!-- /wp:heading -->  <!-- wp:paragraph --> Open-source platforms like <strong>openHAB</strong> and <strong>Home Assistant</strong> provide flexibility that proprietary platforms can't match, enabling deep customization and control over your devices. These platforms support a broad range of devices from various brands, making it possible to create complex and tailored automations. <!-- /wp:paragraph -->  <!-- wp:list --> <ul class="wp-block-list"><!-- wp:list-item --> <li><strong>openHAB</strong>: Known for its powerful customization features, openHAB enables you to create intricate routines with <strong>Blockly Rules</strong>, a visual rule editor that simplifies automation building. openHAB's <strong>Semantic Model</strong> also allows you to categorize devices, creating a well-organized, expandable system. openHAB is designed to run locally, meaning your data stays private and is accessible without an internet connection. To learn more or get support, explore the <a href="https://community.openhab.org/">openHAB Community</a>.</li> <!-- /wp:list-item -->  <!-- wp:list-item --> <li><strong>Home Assistant</strong>: Another highly flexible open-source option, Home Assistant offers integration with thousands of devices and supports a wide range of customization options. It's especially suited for those looking to expand their system with advanced controls, such as location-based automations and deep integrations with MQTT for DIY projects. For support, the <a href="https://community.home-assistant.io/">Home Assistant Community</a> provides extensive documentation and a forum for troubleshooting and inspiration.</li> <!-- /wp:list-item --></ul> <!-- /wp:list -->  <!-- wp:paragraph --> By exploring these open-source platforms, you'll gain the ability to fine-tune your smart home system, creating automations and routines that go beyond the limitations of off-the-shelf solutions. <!-- /wp:paragraph -->  <!-- wp:heading {"level":4} --> <h4 class="wp-block-heading"><strong>Tips for a Smooth Smart Home Experience</strong></h4> <!-- /wp:heading -->  <!-- wp:paragraph --> Getting the most out of your smart home setup often requires setting realistic expectations and focusing on gradual improvements. Here are three key expectations to keep in mind and how to enhance them over time: <!-- /wp:paragraph -->  <!-- wp:heading {"level":5} --> <h5 class="wp-block-heading"><strong>1. Start Simple with Automations and Gradually Add Complexity</strong></h5> <!-- /wp:heading -->  <!-- wp:paragraph --> When beginning with automations, it's best to keep things simple to avoid feeling overwhelmed. For instance, you might start with a basic routine to turn on lights at sunset. As you get comfortable, you can add more conditions and actions to refine this automation. <!-- /wp:paragraph -->  <!-- wp:list --> <ul class="wp-block-list"><!-- wp:list-item --> <li><strong>Example</strong>:</li> <!-- /wp:list-item -->  <!-- wp:list-item --> <li><strong>Initial Automation</strong>: Lights turn on at sunset.</li> <!-- /wp:list-item -->  <!-- wp:list-item --> <li><strong>Improvement</strong>: Lights turn on at sunset only if motion is detected in the room, and they dim to 50% if it's after 10:00 PM.</li> <!-- /wp:list-item --></ul> <!-- /wp:list -->  <!-- wp:paragraph --> This gradual approach lets you understand how different devices and triggers work together before diving into more complex routines. <!-- /wp:paragraph -->  <!-- wp:heading {"level":5} --> <h5 class="wp-block-heading"><strong>2. Expect and Troubleshoot Connectivity Issues</strong></h5> <!-- /wp:heading -->  <!-- wp:paragraph --> Connectivity issues can arise, especially if you have a large number of Wi-Fi devices. Don't expect everything to work flawlessly from the start; network interference and device limitations can cause temporary disruptions. Over time, you can strengthen your network to support more devices and reduce lag. <!-- /wp:paragraph -->  <!-- wp:list --> <ul class="wp-block-list"><!-- wp:list-item --> <li><strong>Example</strong>:</li> <!-- /wp:list-item -->  <!-- wp:list-item --> <li><strong>Initial Setup</strong>: Use your existing Wi-Fi network to connect devices like smart bulbs, speakers, and sensors.</li> <!-- /wp:list-item -->  <!-- wp:list-item --> <li><strong>Improvement</strong>: Install a mesh Wi-Fi system to improve coverage and add a dedicated network segment for IoT devices. This approach can improve response times and reduce connectivity drops by isolating smart home traffic from other internet activities.</li> <!-- /wp:list-item --></ul> <!-- /wp:list -->  <!-- wp:paragraph --> Improving network infrastructure over time ensures a more reliable smart home experience, even as you expand your system. <!-- /wp:paragraph -->  <!-- wp:heading {"level":5} --> <h5 class="wp-block-heading"><strong>3. Allow Time for Customization and Learning</strong></h5> <!-- /wp:heading -->  <!-- wp:paragraph --> Learning to customize your smart home with open-source platforms takes time and patience. At first, you may set up simple automations, but as you grow more comfortable, you can dive into advanced integrations, like setting up MQTT for device communication or integrating custom sensors. <!-- /wp:paragraph -->  <!-- wp:list --> <ul class="wp-block-list"><!-- wp:list-item --> <li><strong>Example</strong>:</li> <!-- /wp:list-item -->  <!-- wp:list-item --> <li><strong>Basic Setup</strong>: Create a simple routine that lowers the thermostat temperature when you leave home.</li> <!-- /wp:list-item -->  <!-- wp:list-item --> <li><strong>Improvement</strong>: Add an occupancy condition and use MQTT to enable remote control, so that the thermostat adjusts only when no one is home. You could further refine this automation by adding time-of-day triggers to minimize energy consumption during peak hours.</li> <!-- /wp:list-item --></ul> <!-- /wp:list -->  <!-- wp:paragraph --> Over time, you'll build a unique and efficient system that meets your specific needs, learning as you go. <!-- /wp:paragraph -->  <!-- wp:paragraph --> For more tips and inspiration, <strong>SensorPoweredHome.com</strong> is a valuable resource. It offers a wide range of articles and guides to help you implement both simple and advanced routines, troubleshoot issues, and explore custom solutions. <!-- /wp:paragraph -->  <!-- wp:heading {"level":4} --> <h4 class="wp-block-heading"><strong>Resources for Learning and Growing in Smart Home Automation</strong></h4> <!-- /wp:heading -->  <!-- wp:paragraph --> Expanding your knowledge and troubleshooting skills is essential as you build out your smart home. Here are some recommended resources: <!-- /wp:paragraph -->  <!-- wp:list --> <ul class="wp-block-list"><!-- wp:list-item --> <li><strong>SensorPoweredHome.com</strong>: A great resource for both beginners and experienced users, offering tutorials, guides, and ideas for smart home routines and automation. Topics cover everything from setting up basic routines to troubleshooting advanced issues, making it ideal for users looking to enhance their setup gradually.</li> <!-- /wp:list-item -->  <!-- wp:list-item --> <li><strong>openHAB Community Forum</strong>: The <a href="https://community.openhab.org/">openHAB Community</a> is a highly active forum that covers a variety of topics, from beginner setup to complex automations. With tutorials, user-contributed guides, and troubleshooting advice, it's an invaluable resource for anyone using openHAB.</li> <!-- /wp:list-item -->  <!-- wp:list-item --> <li><strong>Home Assistant Community Forum</strong>: The <a href="https://community.home-assistant.io/">Home Assistant Community</a> is an essential resource for those using Home Assistant, providing documentation, Q&A, and real-life automation examples from other users.</li> <!-- /wp:list-item -->  <!-- wp:list-item --> <li><strong>Smart Home Solver</strong>: A website that reviews smart home devices and offers practical advice for setting up different devices and troubleshooting issues. <strong>Smart Home Solver</strong> frequently publishes guides and comparisons, helping you stay up to date on new smart home products.</li> <!-- /wp:list-item -->  <!-- wp:list-item --> <li><strong>Tech With Brett (YouTube)</strong>: A YouTube channel focused on smart home automation and setup. Brett provides easy-to-follow tutorials and in-depth reviews on a variety of devices, from lighting to security and voice assistants. His content is beginner-friendly and gives viewers practical, hands-on advice.</li> <!-- /wp:list-item --></ul> <!-- /wp:list -->  <!-- wp:paragraph --> These resources provide valuable insights, support, and inspiration, enabling you to grow your smart home knowledge gradually and implement effective, customized solutions. By starting with realistic expectations and building on small successes, you'll set yourself up for an enjoyable and rewarding smart home experience. <!-- /wp:paragraph -->  <!-- wp:separator --> <hr class="wp-block-separator has-alpha-channel-opacity"/> <!-- /wp:separator -->  <!-- wp:heading {"level":3} --> <h3 class="wp-block-heading">11. <strong>Frequently Asked Questions (FAQ)</strong></h3> <!-- /wp:heading -->  <!-- wp:paragraph --> Starting with smart home technology raises several common questions. Here are answers to help you better understand how to integrate devices, choose equipment, manage costs, and secure your system effectively. <!-- /wp:paragraph -->  <!-- wp:heading {"level":4} --> <h4 class="wp-block-heading"><strong>Q1: What if devices don't work well together?</strong></h4> <!-- /wp:heading -->  <!-- wp:paragraph --> Smart home devices sometimes have compatibility issues, especially if they're from different brands or use different protocols (e.g., Wi-Fi, Zigbee, Z-Wave). Here are some ways to improve device compatibility: <!-- /wp:paragraph -->  <!-- wp:list --> <ul class="wp-block-list"><!-- wp:list-item --> <li><strong>Use a Hub or Bridge</strong>: A smart hub like <strong>Samsung SmartThings</strong> or a bridge like the <strong>Philips Hue Bridge</strong> can help connect devices using different communication protocols. Hubs and bridges act as a middle layer, allowing various devices to interact.</li> <!-- /wp:list-item -->  <!-- wp:list-item --> <li><strong>Choose Compatible Ecosystems</strong>: Stick to one ecosystem—such as Amazon Alexa, Google Assistant, or Apple HomeKit—when purchasing devices. This helps ensure they work smoothly together without needing extra integration.</li> <!-- /wp:list-item -->  <!-- wp:list-item --> <li><strong>Consider Open-Source Solutions</strong>: Platforms like <strong>openHAB</strong> and <strong>Home Assistant</strong> allow greater flexibility by supporting a wide range of devices and protocols. They're ideal for DIY enthusiasts looking to integrate devices that may not natively work together.</li> <!-- /wp:list-item --></ul> <!-- /wp:list -->  <!-- wp:paragraph --> If compatibility remains a problem, online forums, like the <strong>openHAB Community</strong> or <strong>Home Assistant Community</strong>, provide valuable troubleshooting advice and integration tips. <!-- /wp:paragraph -->  <!-- wp:heading {"level":4} --> <h4 class="wp-block-heading"><strong>Q2: Is a hub necessary for a smart home?</strong></h4> <!-- /wp:heading -->  <!-- wp:paragraph --> Not necessarily. Whether you need a hub depends on the devices you plan to use and your automation goals: <!-- /wp:paragraph -->  <!-- wp:list --> <ul class="wp-block-list"><!-- wp:list-item --> <li><strong>No Hub Required for Wi-Fi Devices</strong>: Many Wi-Fi-based devices, such as smart plugs, bulbs, and cameras, connect directly to your home network without a hub. These can be controlled via their individual apps or through smart assistants like Alexa or Google Assistant.</li> <!-- /wp:list-item -->  <!-- wp:list-item --> <li><strong>Hubs for Zigbee and Z-Wave Devices</strong>: If you use Zigbee or Z-Wave devices, a hub is essential as these protocols require a dedicated device to facilitate communication. The <strong>SmartThings Hub</strong> or <strong>Amazon Echo 4th Gen</strong> (which supports Zigbee) are popular options.</li> <!-- /wp:list-item -->  <!-- wp:list-item --> <li><strong>Hubs for Advanced Automation</strong>: If you want advanced or multi-protocol automation, a hub or open-source solution like openHAB is beneficial. It centralizes control and enhances automation options, allowing for complex routines.</li> <!-- /wp:list-item --></ul> <!-- /wp:list -->  <!-- wp:heading {"level":4} --> <h4 class="wp-block-heading"><strong>Q3: How much does a basic smart home setup cost?</strong></h4> <!-- /wp:heading -->  <!-- wp:paragraph --> A basic smart home setup's cost varies depending on the number and type of devices you choose. Here are rough cost estimates: <!-- /wp:paragraph -->  <!-- wp:list --> <ul class="wp-block-list"><!-- wp:list-item --> <li><strong>Entry-Level Setup (100-200)</strong>: A basic setup might include a few Wi-Fi smart bulbs, a smart plug, and a smart speaker (e.g., an Amazon Echo Dot or Google Nest Mini). This provides basic lighting control and voice assistant integration.</li> <!-- /wp:list-item -->  <!-- wp:list-item --> <li><strong>Mid-Level Setup (300-500)</strong>: A mid-level setup could include additional smart bulbs, a smart thermostat, and security features like a smart camera or video doorbell. You'll have more comprehensive control over lighting, climate, and security.</li> <!-- /wp:list-item -->  <!-- wp:list-item --> <li><strong>Advanced Setup (600 and up): A full-featured setup might involve a smart hub, several smart lights, sensors (motion, door/window), and smart security cameras. This setup allows you to automate routines and integrate devices across multiple rooms for a robust experience.

      DIY options can reduce costs, especially if you build components or use open-source platforms like openHAB or Home Assistant, which allow greater customization without recurring fees.

      Q4: How to secure smart home devices?

      Securing smart home devices is essential to protect your privacy and prevent unauthorized access. Here are best practices for keeping your system secure:

      • Use Strong, Unique Passwords: Set unique passwords for each device, hub, and app. Avoid using default passwords, which are easy for attackers to guess. Consider using a password manager like LastPass to keep track of complex passwords.
      • Enable Two-Factor Authentication (2FA): For accounts that offer it, enable 2FA to add an extra layer of protection. Services like Google and Amazon support 2FA, making it more challenging for unauthorized users to access your devices.
      • Segment Your Network: Create a separate guest network for IoT devices, isolating them from your primary devices like computers and phones. Many routers support guest networks, which prevent potential hackers from accessing sensitive data if they breach one device.
      • Disable Unnecessary Features: Turn off Universal Plug and Play (UPnP) and remote access unless needed, as these features can create vulnerabilities. Check your router settings and each device’s app to disable these features.
      • Keep Firmware Updated: Regularly update device firmware and apps. Many updates include security patches that fix known vulnerabilities, protecting devices from the latest threats.

      Q5: Can I set up a smart home if I’m not tech-savvy?

      Yes, you can set up a smart home even if you’re not tech-savvy! Many smart home devices are designed for easy installation and use. Here are tips for beginners:

      • Start Small: Begin with user-friendly devices like smart bulbs, plugs, or a voice assistant (Amazon Echo or Google Nest). These devices are typically easy to set up through simple apps.
      • Use Pre-Configured Routines: Many apps, like Amazon Alexa and Google Home, offer pre-configured routines to get started with automation without needing technical knowledge.
      • Join Supportive Communities: Forums like SensorPoweredHome.com, openHAB Community, and Reddit’s r/smarthome offer advice, answer questions, and provide step-by-step guides.

      With patience and the right resources, anyone can start and enjoy the benefits of a smart home.

      Q6: What are the pros and cons of using a voice assistant?

      Voice assistants, like Amazon Alexa, Google Assistant, and Apple Siri, offer convenience but have limitations and privacy considerations.

      • Pros:
      • Hands-Free Control: Use voice commands to control devices without needing a smartphone or remote.
      • Quick Access to Information: Ask for weather updates, traffic, and news.
      • Routine Automation: Voice assistants make it easy to set up routines and group multiple devices under a single command.
      • Cons:
      • Privacy Concerns: Voice assistants may inadvertently record conversations or use data for targeted ads.
      • Limited Device Compatibility: Not all devices work with all assistants; ensure compatibility before buying.
      • Dependence on Internet: Most voice assistants require internet connectivity, meaning they may not work if the network goes down.

      To enhance privacy, review each assistant’s privacy settings to limit data sharing and disable features like microphone usage when not needed.

      Q7: Can smart home devices increase my energy savings?

      Yes, many smart home devices can help reduce energy consumption, potentially lowering utility bills. Here are some ways to achieve this:

      • Smart Thermostats: Devices like the Google Nest or Ecobee SmartThermostat learn your habits and adjust temperatures based on occupancy, reducing heating/cooling costs by only activating when needed.
      • Smart Lighting: Use smart bulbs or switches to automate lighting schedules, ensuring lights aren’t left on unnecessarily. For example, set lights to turn off during the day or when no motion is detected.
      • Energy Monitors: Energy monitoring devices, such as the Sense Energy Monitor, provide real-time data on energy usage, helping you identify high-usage appliances and adjust behaviors to conserve energy.

      Many of these devices offer tracking features so you can monitor your energy savings over time.

      Q8: How reliable are smart home devices?

      Most smart home devices are quite reliable, but they depend on factors like Wi-Fi connectivity, power supply, and compatibility. Here are some tips to improve reliability:

      • Choose Reputable Brands: Opt for well-reviewed brands with good support, as they tend to provide more stable devices with regular firmware updates.
      • Use a Mesh Wi-Fi Network: If your home has many devices or is large, a mesh Wi-Fi system can improve connectivity, ensuring each device has a strong signal.
      • Have Backup Power: For critical devices, like security systems or smart locks, consider using a battery backup or UPS (Uninterruptible Power Supply) to keep them functioning during power outages.

      If reliability issues persist, forums like openHAB Community and Home Assistant Community provide troubleshooting advice tailored to specific devices.


      12. Conclusion

      Building a smart home can be a fulfilling and transformative experience, enhancing convenience, security, and energy efficiency. Here’s a recap of the key points discussed throughout this guide, along with tips to ensure an enjoyable, rewarding journey.

      Recap of Key Points

      In this guide, we covered essential aspects of creating and maintaining a smart home system:

      • Understanding Devices and Platforms: We explored the core components of a smart home, including lighting, thermostats, security devices, and hubs, as well as open-source platforms like openHAB and Home Assistant for deep customization.
      • Automation and Routines: By learning the basics of automation—triggers, conditions, and actions—you can start creating routines that fit seamlessly into your daily life, from morning routines to energy-saving automations.
      • Maintaining and Troubleshooting: A smooth-running smart home requires regular updates, occasional troubleshooting, and security best practices. Ensuring devices are secure and reliable is vital for long-term enjoyment.
      • Scaling with MQTT and Seasonal Adjustments: As your system grows, protocols like MQTT enable flexible, efficient expansion. Seasonal adjustments, such as temperature regulation or holiday lighting, can adapt your smart home to changing needs throughout the year.

      By applying these foundational concepts, you’re equipped to create a smart home that meets your unique needs and evolves as technology advances.

      Encouragement for Starting Small

      For beginners, the vast array of devices and options can feel overwhelming. Start small with essential devices like smart bulbs or a thermostat, gradually adding features as you gain confidence. Focus on simple automations at first, such as turning lights on at sunset or setting a morning coffee routine. With each success, you’ll become more comfortable and ready to take on more complex integrations and routines.

      Remember, there’s no need to achieve everything at once. As you expand, you’ll discover what works best for your lifestyle, which helps guide future investments and customizations. Starting small also gives you time to adjust and explore options without a heavy initial cost.

      Final Tips for an Enjoyable Smart Home Journey

      Above all, enjoy the process of experimenting, learning, and gradually transforming your home. Here are a few parting tips for a satisfying smart home journey:

      • Embrace Experimentation: Try new routines, adjust settings, and experiment with different devices and automations. Smart homes are highly customizable, and small tweaks can make a big difference in how well they fit your lifestyle.
      • Tap into Community Support: Online communities, such as openHAB Community and Home Assistant Community, offer advice, inspiration, and solutions. Visiting these resources regularly can help you discover new ideas and solve problems as they arise.
      • Keep Learning and Adapting: Smart home technology evolves quickly, with new devices and features emerging regularly. By staying curious and open to learning, you’ll be ready to take advantage of new opportunities to enhance your setup.

      A smart home is more than just technology; it’s an opportunity to improve your living environment, enhance comfort, and enjoy more convenience every day. Embrace the journey, start small, and enjoy the endless possibilities of transforming your home into a smart, responsive environment that grows with you.

      Leave a Comment

      Your email address will not be published. Required fields are marked *

      Scroll to Top