Home automation is transforming homes into more convenient, efficient, and secure environments, and Home Assistant has become a go-to solution for enthusiasts worldwide. This article will guide you through everything you need to know to start your journey with Home Assistant, from installation to creating automations and scenes.
Part 1: Getting Started with Home Assistant
1. Introduction to Home Assistant
Overview of Home Assistant
Home Assistant is an open-source platform designed to centralize and manage smart home devices and automate everyday tasks. It’s local, meaning your data stays within your home network, enhancing security and privacy. Home Assistant offers a high degree of customization, supports thousands of devices, and allows for extensive automation and customization, making it one of the most powerful and flexible options available for home automation.
Why Choose Home Assistant for Home Automation?
Home Assistant stands out for its robust local control, extensive integrations, and customizable interface. Unlike many commercial solutions, which may rely on the cloud, Home Assistant is designed to run entirely within your home network. This not only boosts data security but also reduces latency, giving you a fast, private, and reliable smart home experience. Home Assistant is also highly extensible, making it ideal for users seeking flexibility in their automation setups.
2. Core Features of Home Assistant
Device Integration
Home Assistant supports a wide array of devices, from lights and thermostats to security cameras and motion sensors. It allows you to control all these devices through a single platform, streamlining your smart home management.
Automation and Scenes
Automations are at the heart of Home Assistant’s functionality. You can create automations that respond to specific triggers (like motion detection or time of day) and set conditions for activating different devices. Scenes allow you to save the state of multiple devices and activate them together, creating routines like “Good Morning” or “Bedtime” with ease.
Customization and User Interface
Home Assistant’s interface is entirely customizable. You can design your dashboard to display the devices and data most relevant to you, including adding custom themes, icons, and layouts to make it feel personalized. The UI allows you to visualize data from different sensors, control devices, and monitor automation routines in real time.
3. Supported Devices and Integrations
Overview of Supported Brands and Devices
Home Assistant has a vast ecosystem of supported devices and brands, including Philips Hue, TP-Link, Ecobee, Sonos, and more. This broad compatibility ensures you can integrate various products under one roof without needing multiple apps.
Integrating Smart Home Devices (Lights, Thermostats, Cameras, etc.)
Home Assistant makes it easy to integrate smart home devices through step-by-step instructions. You can control lights, thermostats, security cameras, and other smart home devices within the interface, streamlining their operation and interaction.
Popular Integrations (Amazon Alexa, Google Assistant, Apple HomeKit)
Voice assistants like Amazon Alexa, Google Assistant, and Apple HomeKit enhance your Home Assistant experience, allowing you to control devices via voice commands. You can configure each voice assistant to recognize and control Home Assistant integrations, further simplifying device management.
4. Getting Started with Home Assistant
Installation Options (Raspberry Pi, Virtual Machine, etc.)
Home Assistant is highly versatile and can be installed on various types of hardware, each offering distinct benefits depending on your needs, existing setup, and technical familiarity. Here’s a quick overview of your main installation options:
- Raspberry Pi: The Raspberry Pi is a compact, low-cost computer, making it one of the most popular options for Home Assistant installations. The Raspberry Pi 4 with at least 4GB of RAM is recommended for optimal performance, though other models can work as well. Installation involves downloading Home Assistant OS and flashing it onto an SD card, making it accessible for beginners and advanced users alike.
- Virtual Machine (VM): A Virtual Machine setup is ideal for those who already have an always-on computer or server. Software like VirtualBox or VMware can run Home Assistant as a VM, enabling you to dedicate part of your existing hardware to manage your smart home.
- Docker Container: For advanced users, installing Home Assistant in a Docker container offers modularity and control over dependencies. This option allows Home Assistant to run on systems where Docker is installed, such as NAS devices or custom servers, but requires familiarity with Docker commands and management.
Installing Home Assistant on a Raspberry Pi
For most users, installing Home Assistant on a Raspberry Pi is a straightforward and cost-effective way to get started with home automation. Here’s a detailed, step-by-step guide to setting up Home Assistant on a Raspberry Pi.
Hardware Requirements
To install Home Assistant on a Raspberry Pi, you’ll need:
- Raspberry Pi 4 (recommended) with at least 4GB of RAM for optimal performance. Lower models, such as the Raspberry Pi 3, can work but may experience performance limitations with more devices and automations.
- MicroSD Card (16GB or larger): A high-quality, high-speed SD card (Class 10 or UHS-1) is recommended to ensure faster read/write speeds.
- Power Supply: A USB-C power supply capable of delivering 3A or more, especially important for Raspberry Pi 4 to ensure stable performance.
- Ethernet Cable (optional but recommended): A wired Ethernet connection provides better stability for smart home applications, though Wi-Fi can also work if your Pi is positioned within range of the router.
You can purchase these components individually or as part of a Raspberry Pi starter kit. Additionally, a USB SD card reader might be necessary if your computer doesn’t have a built-in SD card slot.
Step-by-Step Installation Guide
- Download Home Assistant OS Image
- Go to the Home Assistant Operating System Download Page and download the Home Assistant OS image specific to your Raspberry Pi model. The image is pre-configured for Home Assistant, making it easy to set up with minimal configuration.
- Flash the OS Image to the SD Card
- Use software like balenaEtcher (free and available for Windows, macOS, and Linux) to flash the Home Assistant OS image onto your SD card. Insert your SD card into your computer, open balenaEtcher, select the Home Assistant image, and flash it to the card.
- After flashing, safely eject the SD card from your computer. Detailed instructions on flashing an SD card can be found on the balenaEtcher website.
- Insert the SD Card and Connect the Raspberry Pi
- Insert the flashed SD card into your Raspberry Pi. Connect the Pi to your network using an Ethernet cable if possible. Then, connect the power supply, which will automatically power on the Pi and start the Home Assistant installation process.
- It may take a few minutes for the initial setup. You can monitor the status of the setup by connecting the Pi to an HDMI display, which will show the installation progress.
- Access Home Assistant for the First Time
- Once the Raspberry Pi finishes the setup, Home Assistant should be accessible from a browser on the same network. On your computer or smartphone, open a web browser and go to
http://homeassistant.local:8123. If this address doesn’t work, find the IP address of your Pi (usually available through your router) and enter it in the browser with:8123(e.g.,http://192.168.1.10:8123). - You’ll be greeted by a welcome screen prompting you to create an admin account. This account is necessary to access and manage Home Assistant, so choose a secure username and password. More guidance on accessing Home Assistant is available in the Home Assistant First Steps Guide.
Tips for Optimizing Performance on a Raspberry Pi
To ensure smooth performance, especially if you’re adding multiple devices or complex automations, consider the following tips:
- Minimize SD Card Wear: Home Assistant performs frequent read/write operations. Use a high-quality SD card and consider a setup with minimal logging or database retention. Alternatively, you can use an SSD with the Pi 4 to improve durability and speed.
- Regular Backups: Home Assistant has a built-in backup tool under Settings > System > Backups. Regular backups help protect your setup and can be stored locally or on cloud storage.
- Monitor System Health: The System Monitor integration can help you keep track of CPU, memory, and disk usage. This is useful for maintaining optimal performance, as heavy resource usage may require additional upgrades or adjustments.
For more information on optimizing Home Assistant for Raspberry Pi, see the Home Assistant Raspberry Pi Guide.
Installing Home Assistant on a Raspberry Pi provides an affordable, powerful solution for home automation. By following these steps, you’ll have Home Assistant up and running, ready to manage and automate your devices, and ready to expand as your smart home needs grow. Once installed, you can start exploring integrations, automations, and custom dashboards to create a personalized smart home experience.
5. Setting Up Home Assistant for the First Time
Setting up Home Assistant for the first time is a straightforward process. Once you’ve completed the installation on your chosen hardware, follow these steps to get everything up and running:
- First Login and Account Creation
- After booting up, open a web browser and go to
http://homeassistant.local:8123or enter the IP address of your Home Assistant device, followed by:8123. You’ll be greeted by a welcome screen inviting you to create an account. This account will be the administrator account and is required to access your Home Assistant dashboard. - Choose a secure username and password, as this account provides access to all your connected devices and automations. Remember to store your credentials securely! For more details on accessing your Home Assistant instance, you can refer to the Home Assistant Getting Started Guide.
- Configuring Location and Preferences
- Once your account is set up, Home Assistant will prompt you to configure location and regional settings, such as time zone, elevation, and units of measurement (metric or imperial). These settings are essential for accurate automations based on location and time.
- For example, if you plan to set up automations like turning on lights at sunset or controlling devices based on the weather, your location settings ensure accurate timing and data for these routines. For more on setting location and preferences, see Home Assistant’s Location Settings.
- Auto-Discovery of Devices
- Once your initial settings are configured, Home Assistant automatically scans your network to identify compatible smart devices. This feature, known as “auto-discovery,” simplifies the integration process by detecting devices that are supported out-of-the-box.
- The types of devices typically discovered include smart lights, plugs, cameras, thermostats, and media devices. For each device detected, Home Assistant will suggest appropriate integrations, which you can enable with just a click.
- Some devices might require manual configuration, especially if they’re from lesser-known brands or have special connectivity requirements. You can always add these later through the Integrations section. More information on integrating devices can be found in the Home Assistant Device Integrations Guide.
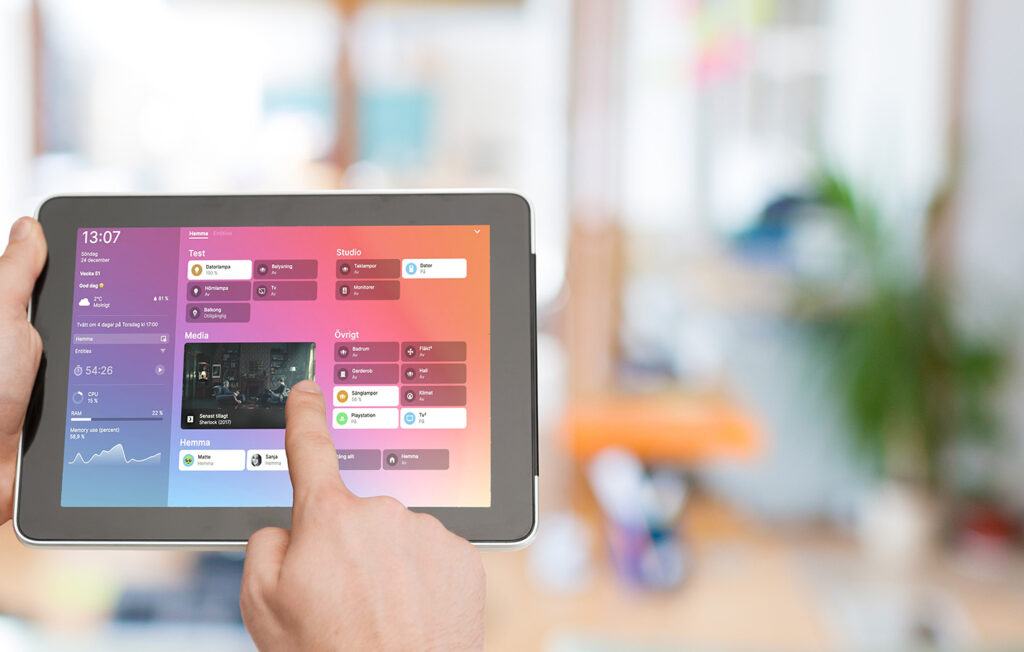
- Exploring the Dashboard
- After completing the initial setup, you’ll land on the Home Assistant dashboard, a user-friendly control center where you can monitor and manage your devices. The dashboard displays all configured devices and integrations, allowing you to turn devices on and off, monitor sensor data, and view the status of each device.
- The dashboard is highly customizable, so you can arrange devices, set up quick-access buttons, and create views for different rooms or areas in your home. If you want more personalized control, Home Assistant lets you create custom dashboards for different family members or purposes (e.g., a “Living Room” view or a “Security” view). Check out the Home Assistant User Interface Guide to learn more about customizing your dashboard.
- Adding Integrations Manually
- For any devices that Home Assistant didn’t detect automatically, you can add them manually by navigating to
Settings>Integrationsin the dashboard. From here, you can search for specific devices or services (e.g., Philips Hue, TP-Link, or Sonos) and follow the prompts to connect them to Home Assistant. - Each integration provides a detailed setup guide and any additional configuration needed, such as login credentials or API keys. For example, adding an Amazon Alexa integration requires linking your Amazon account, while integrating a security camera may need a specific URL for accessing the camera feed. The Home Assistant Integrations Page offers a full list of supported integrations, making it easy to find information on connecting specific devices.
- Exploring Automations and Scenes
- Now that your devices are integrated, you can explore Home Assistant’s automation and scene capabilities. Automations allow you to set up triggers and actions, such as turning off lights when you leave home or adjusting the thermostat based on the time of day.
- Scenes let you save device states and activate them together with one command. For example, a “Goodnight” scene could turn off all lights and lower the thermostat, while a “Morning Routine” could adjust the thermostat, start the coffee maker, and turn on certain lights.
- The initial setup is a great time to experiment with basic automations and scenes to get a feel for Home Assistant’s capabilities. As you become more familiar, you can start creating complex routines tailored to your home and lifestyle. For more in-depth guidance, visit the Home Assistant Automation Guide.
- Setting Up Remote Access (Optional)
- If you want to control Home Assistant while away from home, consider setting up remote access. Home Assistant Cloud is an easy, secure option that requires no additional configuration on your router. Alternatively, advanced users can configure their router for remote access using DuckDNS and Let’s Encrypt for secure access.
- Remote access lets you monitor your home, control devices, and receive notifications, making it an essential feature for those who frequently travel or want enhanced security. To learn more about secure remote access options, see the Home Assistant Remote Access Guide.
With this initial setup complete, you’re ready to explore Home Assistant’s endless possibilities, from integrating new devices to creating powerful automations that truly enhance your smart home experience. For more details on any of these steps, be sure to visit the official Home Assistant Documentation.
6. Creating Automations and Scenes
Setting Up Basic Automations
Automations in Home Assistant allow you to create specific routines that make your home more efficient, convenient, and responsive. Automations are structured with three main components: triggers, conditions, and actions. Here’s a step-by-step guide to setting up a basic automation directly from the Home Assistant interface, without using YAML.
- Navigating to Automations
- To start, open your Home Assistant dashboard, click on Settings, and then select Automations & Scenes. From there, click Create Automation to open the automation editor.
- You’ll see options to create a new automation from scratch or to use a template. Select Start with an Empty Automation for complete customization. For more detailed navigation help, you can refer to the Home Assistant Automations Guide.
- Defining the Trigger
- Trigger is what sets the automation in motion. For example, to create an automation that turns off lights when no motion is detected, you’ll select a Device Trigger based on your motion sensor.
- Click on Add Trigger and choose the type of trigger you want (e.g., Device). Select your motion sensor from the list and set the trigger to Off (i.e., no motion detected).
- Common trigger types include:
- Device State: Activates based on device state changes (e.g., motion detected, door opened).
- Time: Executes at a specified time or interval (e.g., every day at sunset).
- Event: Responds to specific events, such as arrival at a location or a certain condition being met in your smart home.
- Adding Conditions (Optional)
- Conditions specify criteria that must be met for the automation to run. They’re optional but can add precision to your automation.
- For instance, you could add a Time Condition to ensure the lights only turn off when no motion is detected after 9 p.m. This ensures that the automation runs only during specific times, preventing the lights from turning off when they’re likely needed during the day.
- You can add multiple conditions and set whether all conditions must be met (AND) or if any condition can be met (OR) for the action to take place. For more on conditions and their applications, see the Conditions Documentation.
- Setting the Action
- Action is what Home Assistant does once the trigger (and any conditions) are met. In this example, the action is to turn off a light when no motion is detected.
- Click Add Action and select Device. Choose your light from the list of devices, then set the action to Turn off.
- Home Assistant supports various actions:
- Device Action: Controls a specific device (e.g., turning off a light, adjusting the thermostat).
- Service Call: Runs a service, like notifying you via the Home Assistant app or sending a message.
- Scene Activation: Activates a preconfigured scene.
- After setting your action, you can add additional actions if you’d like multiple devices to respond to the same trigger. For example, you could add a second action to turn off other lights in the room simultaneously. Learn more about actions and their configurations in the Actions Documentation.
- Testing and Saving the Automation
- Once your trigger, condition, and action are set, you’re ready to test the automation. Click Run Actions in the automation editor to preview what the action will do.
- Once you’re satisfied with your setup, click Save and name your automation (e.g., “Turn Off Lights When No Motion”). Your automation is now active and will run automatically whenever the conditions are met.
- Editing and Managing Automations
- After creating your automation, you can always go back to edit, disable, or delete it. Head to Settings > Automations & Scenes to view all active automations. Each automation has a toggle switch, making it easy to enable or disable individual routines as needed. For more tips on managing automations, see the Automation Management Guide.
Creating Scenes for Routine Actions
Scenes in Home Assistant allow you to control the states of multiple devices with a single tap. For example, you might want to create a “Movie Night” scene that dims the lights, lowers the thermostat, and turns on your TV.
- Navigating to Scenes
- From your Home Assistant dashboard, go to Settings > Automations & Scenes, and then select Create Scene. This opens the scene editor.
- Setting Up the Scene
- Name your scene, like “Movie Night” or “Good Morning.”
- Choose the devices you want to include. For example, if you’re setting up a movie night scene, you might select living room lights, TV, and thermostat.
- For each device, adjust the state or setting. For lights, you can set brightness and color; for thermostats, adjust the temperature; and for media players, you can set the power state and volume.
- Saving and Activating the Scene
- Once your devices are set, click Save to finalize your scene. It will now appear in your Home Assistant dashboard for easy activation.
- You can also trigger scenes within automations, making it easy to set up routines that activate multiple scenes in sequence.
For more details on creating and managing scenes, visit the Home Assistant Scenes Guide.
With these steps, you’re ready to set up basic automations and scenes in Home Assistant, giving you more control over your devices and the convenience of custom routines. Each automation and scene helps to build a more responsive, efficient, and enjoyable smart home experience.
7. Using YAML for Custom Configurations
Home Assistant’s automation and customization options become even more powerful with YAML (YAML Ain’t Markup Language), a straightforward, text-based data format. YAML allows for precise configurations and is especially useful when creating complex or unique setups that the graphical interface may not fully support. Here’s a guide to understanding and using YAML within Home Assistant to manage your smart home more effectively.
Introduction to YAML Syntax
YAML is a clean and readable language, designed to be easy to write and understand. Unlike JSON or XML, which use brackets and tags, YAML uses indentation to organize data, making it more intuitive for defining configurations. YAML is often used in Home Assistant’s configuration files for defining devices, automations, scenes, and more.
Key YAML syntax elements to remember:
- Indentation: YAML relies on spaces (not tabs) for structure. Proper indentation is crucial, as it indicates hierarchy and nesting.
- Key-Value Pairs: Each setting is defined by a key-value pair. For example,
device: light.living_room. - Lists: YAML lists are created with hyphens. For example, a list of actions in an automation might look like this:
  action:
    - service: light.turn_on
      entity_id: light.living_room
    - service: media_player.play
      entity_id: media_player.living_room_tv
For a more detailed overview of YAML basics, you can refer to YAML Syntax and Usage, which explains the foundational structure and components.
Editing Configuration Files
The main configuration file in Home Assistant, configuration.yaml, houses all your settings for devices, automations, and integrations. Here’s how to get started with YAML in this file:
- Accessing the Configuration File
- You can access
configuration.yamlthrough Home Assistant’s file editor add-on (recommended for beginners) or by using an external editor like Visual Studio Code if you’re accessing the Home Assistant files directly. - To enable the File Editor, go to Settings > Add-ons > Add-on Store and install File Editor. This will allow you to edit
configuration.yamldirectly from your Home Assistant dashboard. For more information, visit Home Assistant’s Configuration Guide.
- Basic Automation Example Using YAML
- YAML allows you to create automations with more flexibility than the graphical editor. For example, to create an automation that turns on a light when motion is detected, you would add the following to
configuration.yaml:
   automation:
     - alias: "Turn on light when motion detected"
       trigger:
         platform: state
         entity_id: binary_sensor.motion_sensor
         to: "on"
       action:
         service: light.turn_on
entity_id: light.living_room- This automation includes:
- Alias: A name for the automation (“Turn on light when motion detected”).
- Trigger: Sets the automation in motion when
binary_sensor.motion_sensorchanges state to “on.” - Action: Specifies the action to take (turn on
light.living_room).
- Defining Integrations
- YAML is also used to define integrations that may not be detected automatically. For instance, if you’re adding an IP-based camera manually, your configuration might look like this:
   camera:
     - platform: generic
       name: Living Room Camera
       still_image_url: http://192.168.1.5:8080/image.jpg
       stream_source: http://192.168.1.5:8080/video
verify_ssl: false- In this example, you’re setting up a camera with a specific URL and naming it “Living Room Camera.” Each key-value pair defines specific parameters for the device integration. For a full list of integrations and setup instructions, visit the Home Assistant Integrations Page.
- Creating Complex Automations with Multiple Actions
- YAML’s versatility shines in complex automations. For example, you could create a bedtime routine automation that turns off all lights, locks the doors, and adjusts the thermostat:
   automation:
     - alias: "Bedtime Routine"
       trigger:
         platform: time
         at: "22:00:00"
       action:
         - service: light.turn_off
           entity_id: all
         - service: lock.lock
           entity_id: lock.front_door
         - service: climate.set_temperature
           entity_id: climate.bedroom_thermostat
           data:
temperature: 18- This automation combines multiple actions triggered by a specified time, showcasing YAML’s flexibility to handle more intricate routines.
- Testing and Validating YAML Configurations
- Once you’ve edited
configuration.yaml, it’s crucial to validate the configuration to avoid syntax errors. Home Assistant offers a built-in Check Configuration tool under Settings > System > Check Configuration. Run this check before reloading Home Assistant to ensure your changes are error-free. - YAML syntax errors can prevent automations from running, so validating changes helps you catch issues early. For more on testing and troubleshooting YAML, see the Home Assistant Configuration Validation Guide.
- Reloading Home Assistant to Apply Changes
- After validating your configuration, apply your changes by reloading Home Assistant. Go to Developer Tools > YAML and click Reload Automations or Reload Core Configuration depending on what you’ve changed.
- Reloading the system is faster than a full restart and allows you to apply new automations, scenes, or integrations without downtime.
Learning YAML empowers you to maximize Home Assistant’s customization capabilities. From basic automations to complex integrations, YAML unlocks a new level of control, allowing for unique, precise automation tailored to your home. For a comprehensive reference on all YAML configuration options, check out the Home Assistant YAML Documentation.
Conclusion
Home Assistant offers an unparalleled level of customization, security, and control over your smart home, making it a top choice for both beginners and tech-savvy enthusiasts alike. From setting up the initial configuration to diving into complex automations and scenes, Home Assistant provides the tools you need to build a smart home tailored to your specific needs and preferences.
By exploring both the graphical interface and the power of YAML, you can achieve virtually any automation setup, from simple routines to intricate sequences involving multiple devices. As you grow more comfortable with the platform, Home Assistant’s open-source flexibility allows you to adapt and scale your smart home with ease, integrating new devices, refining your automations, and personalizing your dashboards.
Whether you want seamless voice control, energy-efficient routines, or enhanced security, Home Assistant has the potential to make your home smarter, safer, and more enjoyable. Start small, build as you go, and enjoy the journey of crafting a home that truly works for you.
Sources and External Links
- Home Assistant Official Documentation: https://www.home-assistant.io/docs/
- YAML Syntax Basics by Clark Evans et al., 2001, O’Reilly Media, provides insights into YAML structure and usage.
- The Smart Home Manual: How to Automate Your Home to Keep Your Family Entertained, Comfortable, and Safe by Marziah Karch (2021), Peachpit Press.
- Privacy and Security in Home Automation Systems – A comprehensive study on the security and data privacy implications of local vs. cloud-based automation solutions. [International Journal of Computer Applications, 2022].