Part 2: Customization and Advanced Features in Home Assistant
In Part 1 of this guide, we explored the basics of Home Assistant, covering installation, initial setup, and essential features. Now, in Part 2, we’ll dive into customization and advanced features that allow you to truly personalize your smart home experience. From UI customization to community resources and advanced automations, this part will equip you with the tools to make Home Assistant a seamless part of your smart home.
7. User Interface Customization
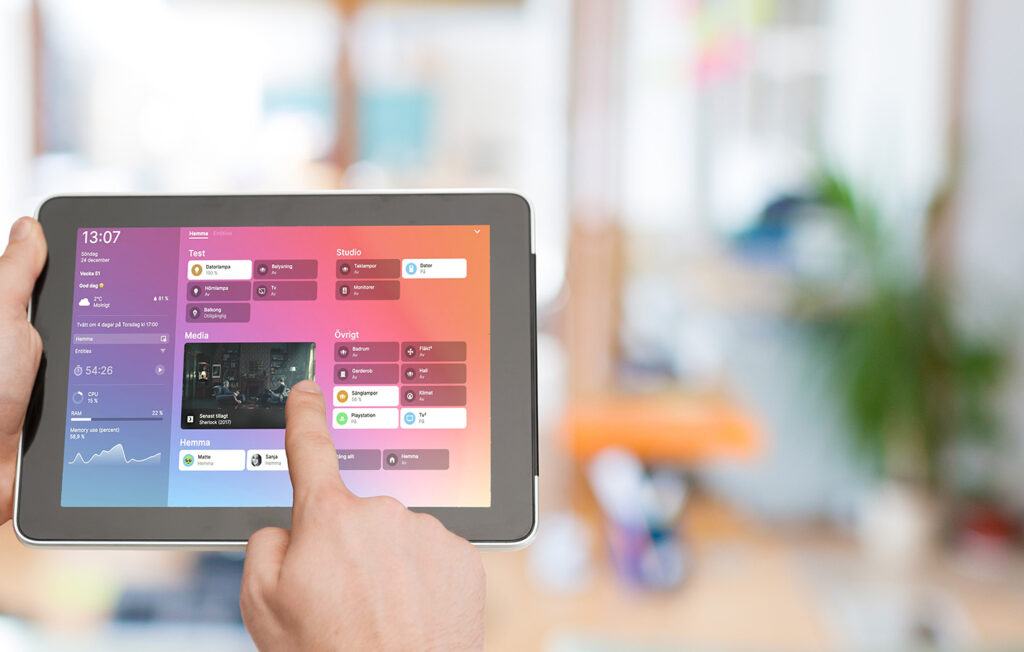
One of Home Assistant’s most appealing features is the flexibility of its user interface, which allows you to tailor the dashboard, also known as the “Lovelace” UI, to meet your specific needs. This customization not only makes your smart home system visually appealing but also enables you to display the exact information you want in a way that’s easy to understand and navigate.
Customizing the Home Assistant Dashboard
The Home Assistant dashboard is highly adaptable and can be customized through an intuitive interface. To start customizing, go to Overview in the sidebar and select Configure UI. This opens the dashboard editor, where you can add, remove, or rearrange components called cards.
Cards are the building blocks of the Lovelace UI. Each card represents a widget that displays information or provides controls for a specific device, group of devices, or service. For instance:
- Entity Card: Displays the status of a single entity, like a light switch or sensor.
- Glance Card: Shows multiple entities in a compact view, useful for monitoring several items at once.
- History Graph Card: Displays historical data for entities, such as temperature trends over time.
- Button Card: Adds buttons to activate specific functions or scenes, like toggling lights on and off.
By organizing cards into different views, you can create dashboards that focus on specific areas of your home or particular device categories. For example, you might set up a “Living Room” view that shows the lighting, media controls, and temperature for that room, or a “Security” view that displays the status of cameras, locks, and sensors around the home.
For a more in-depth tutorial on customizing your dashboard, check out the Home Assistant Lovelace UI Guide.
Adding Custom Cards and Views
Home Assistant comes with a selection of default cards, but to expand your customization options, you can also add custom cards created by the Home Assistant community. Custom cards allow you to display data in unique ways, providing advanced functionality and improving the visual appeal of your dashboard.
Examples of popular custom cards include:
- Weather Card: Shows detailed weather information, including temperature, humidity, and forecast, in a visually appealing format.
- Mini Graph Card: Provides compact and customizable graphs for tracking entities over time, ideal for monitoring trends.
- Gauge Card: Displays data as a gauge, useful for values like battery percentage or temperature.
- Button Card: A highly customizable card for creating buttons with specific functions, great for triggering scenes or toggling devices.
To access and install these custom cards, you’ll need to set up the Home Assistant Community Store (HACS).
What is HACS (Home Assistant Community Store)?
HACS, or the Home Assistant Community Store, is an add-on for Home Assistant that gives you easy access to a wide variety of custom integrations, themes, and custom cards developed by the Home Assistant community. With HACS, you can browse, install, and manage community-contributed components directly within Home Assistant, making it easy to expand the platform’s capabilities and customize your setup.
Setting Up HACS:
- Go to Settings > Add-ons > Add-on Store, and search for HACS.
- Install HACS following the instructions, and restart Home Assistant if necessary.
- After installation, HACS will appear in the sidebar, allowing you to browse and install custom resources.
HACS provides access to thousands of community-created elements, including:
- Custom Cards: For adding enhanced or unique visualizations to your dashboard.
- Themes: To customize the look and feel of your interface.
- Integrations: For connecting to additional smart home devices and services that aren’t included in Home Assistant by default.
For further instructions on setting up and using HACS, visit the Home Assistant Community Store Guide.
Themes and Layout Options
A cohesive design enhances usability and makes your smart home interface more enjoyable to use. Home Assistant allows you to apply themes to change the colors, backgrounds, and fonts of your dashboard, giving it a personalized look that matches your style or decor.
Applying Themes:
- Go to HACS in the sidebar and search for “themes.”
- Browse the available themes and select the ones you’d like to install.
- After installation, activate your theme by going to Settings > Profile and selecting your theme from the Themes dropdown menu.
To further personalize your interface, you can also create your own theme by defining styles in a themes.yaml file. Themes allow you to customize elements like text color, background color, card styling, and accent colors.
Popular Themes in HACS:
Here are five popular themes available in HACS that users enjoy for their aesthetic and functional appeal:
- Dark Cyan Theme: A sleek, modern dark theme with cyan accents, perfect for low-light environments.
- Clear Theme: A minimalistic and clean theme that emphasizes readability, ideal for a straightforward, distraction-free interface.
- Midnight Theme: A visually appealing dark theme with a calming blue hue, designed for late-night use.
- Material Design Theme: Inspired by Google’s Material Design, this theme brings consistency and modernity to your Home Assistant dashboard.
- iOS Dark Mode Theme: Mimics the dark mode theme found on iOS devices, providing a familiar look for Apple users.
These themes can be easily installed and applied through HACS, allowing you to change the look and feel of your interface with just a few clicks. For more details on theme customization, see the Home Assistant Themes Documentation.
Optimizing Layouts:
Beyond themes, Home Assistant lets you control the layout of your views. By arranging and resizing cards within each view, you can create a dashboard layout that makes the most sense for your home. Use compact views for quick access to essentials or larger, detailed views for areas with more complex setups.
With custom cards, themes, and HACS integrations, Home Assistant provides endless possibilities for building a dashboard that not only looks good but also enhances your smart home experience.
8. Home Assistant Add-Ons and Extensions
Add-ons are crucial for extending the capabilities of Home Assistant, enabling you to perform complex automations, improve connectivity, and access files easily. These add-ons run alongside Home Assistant OS and can significantly enhance your smart home setup by integrating external services directly within the platform. Here’s a closer look at some essential add-ons—Node-RED, MQTT Broker, and Samba Share—and how to use Python to interact with them.
Overview of Add-Ons (e.g., Node-RED, MQTT, Samba Share)
Node-RED
Node-RED is a powerful, visual workflow editor that allows you to create complex automations without needing to write traditional code. It uses a “drag-and-drop” interface to connect different nodes (modules) together, making it easy to create intricate automation flows based on conditions, triggers, and actions. With Node-RED, you can build custom automations that are much more flexible than those configured directly in Home Assistant’s automation editor.
For example, you could set up a flow that:
- Turns on the lights in a room when motion is detected.
- Checks if it’s nighttime, then adjusts the lights to a dim setting.
- Sends a notification to your phone if the motion continues for a prolonged period.
Node-RED also supports integrating with other services, like web APIs or third-party applications, and is particularly useful if you want to create multi-step automations involving different devices or services.
Learn more about Node-RED and see examples of automations on the Node-RED website.
MQTT Broker
MQTT (Message Queuing Telemetry Transport) is a lightweight messaging protocol that enables communication between devices. An MQTT broker add-on is essential for integrating MQTT-compatible devices and services within Home Assistant, as it allows you to send and receive messages between devices in real time. MQTT is widely used in IoT applications due to its efficiency and low bandwidth consumption, making it ideal for connecting smart devices across your network.
With the MQTT Broker:
- You can publish messages from one device, like a sensor, to the MQTT broker.
- Other devices or services can subscribe to this topic to receive the sensor’s data.
- This allows for real-time updates, perfect for responsive automations, like turning on a fan if a temperature sensor reports high readings.
Home Assistant provides native support for MQTT, allowing devices to publish their states or receive commands easily through topics. You can also use Python scripts to interact with MQTT by publishing or subscribing to topics from your custom automations.
Explore more about MQTT and its uses in home automation on the MQTT Protocol Website.
Samba Share
The Samba Share add-on enables easy file sharing between Home Assistant and other devices on your network. Once installed, it makes the Home Assistant configuration files accessible over the network, allowing you to edit YAML files, automations, scripts, and other configuration files directly from your computer. This is particularly useful if you need to make quick adjustments to Home Assistant’s configurations without navigating through the web interface.
With Samba Share:
- You can access the
configfolder remotely on your computer. - Open and edit files like
configuration.yaml, automation files, and custom themes. - Transfer files to and from Home Assistant, making it easy to add custom themes, icons, or images.
More about configuring Samba Share can be found in the Samba Project Documentation.
Installing and Managing Add-Ons
To install any add-on, follow these steps:
- Navigate to Add-Ons: Open Home Assistant, go to Settings > Add-ons, and then select Add-on Store.
- Search for Add-Ons: In the Add-on Store, search for the add-on you want to install, such as Node-RED, MQTT, or Samba Share.
- Install and Configure: Click Install and follow the instructions. Once installed, each add-on will appear under Installed Add-Ons, where you can configure settings, manage user permissions, and start, stop, or restart the add-on.
- Start and Access the Add-On: After configuration, click Start to activate the add-on. Some add-ons, like Node-RED and Samba Share, may also provide direct links to open their interfaces.
Each add-on’s settings panel provides options for customization, updates, and managing permissions, making it easy to tailor them to your specific needs.
For more details, refer to the Home Assistant Add-Ons Documentation.
Recommended Add-Ons for Enhanced Functionality
Adding specific add-ons can greatly improve the performance and usability of your Home Assistant setup:
- Node-RED: Ideal for advanced automations with an easy-to-use visual editor. With Node-RED, you can set up highly customized workflows without writing code.
- MQTT Broker: Enables real-time, lightweight communication between devices, crucial for IoT setups and automations requiring fast responses.
- File Editor: Allows direct editing of configuration files within the Home Assistant interface, making it easy to adjust YAML files without leaving the dashboard.
- MariaDB: An alternative database that can improve performance over the default SQLite, especially for setups with large data volumes or high device counts.
- HACS (Home Assistant Community Store): Allows you to install community-created custom components, cards, and themes, expanding Home Assistant’s functionality and aesthetics.
9. Using Python Code with Home Assistant Add-Ons
Python is a versatile tool that can interact with Home Assistant, especially with add-ons like MQTT Broker and Node-RED. Here’s how you can integrate Python code to enhance functionality.
Using Python with MQTT
You can write Python scripts to communicate with Home Assistant’s MQTT broker. This is useful for custom automations or when using devices that don’t natively integrate with Home Assistant but support MQTT.
- Install the
paho-mqttLibrary: This library allows Python to communicate with MQTT.
pip install paho-mqtt- Example Script: This script publishes a message to an MQTT topic.
   import paho.mqtt.client as mqtt

   client = mqtt.Client()
   client.connect("homeassistant.local", 1883, 60)  # Use the address and port of your MQTT broker

   client.publish("home/assistant/light/living_room", "ON")  # Publish a message to turn on a light
   client.disconnect()
Learn more about Python and MQTT with the Paho MQTT Documentation.
Using Python with Node-RED
Node-RED supports integration with Python scripts, especially when using the exec node, which can execute external scripts. This allows you to run Python scripts as part of a Node-RED automation flow.
- Set Up a Python Script: For example, create a script that sends an email or processes data.
   # send_email.py
   import smtplib

   def send_email():
       server = smtplib.SMTP('smtp.example.com', 587)
       server.starttls()
       server.login("your_email@example.com", "password")
       server.sendmail("from@example.com", "to@example.com", "Hello from Home Assistant!")
       server.quit()

send_email()- Call the Script from Node-RED: In Node-RED, use an exec node to call the Python script when a flow is triggered, like when a sensor detects motion or a switch is turned on.
Visit the Node-RED Python Integration Guide for more ways to work with Python in Node-RED.
Using Python with Samba Share
With Samba Share, you can use Python scripts stored on your Home Assistant server and edit them directly from your computer. This makes it convenient to test, update, and maintain custom Python scripts. You can create Python scripts that interact with Home Assistant’s API or use automation triggers and then save these scripts to the Samba Share for easy access and execution.
Integrating these add-ons with Python expands Home Assistant’s automation possibilities significantly. Whether you’re automating workflows with Node-RED, publishing and subscribing to MQTT topics, or remotely managing files via Samba Share, these add-ons provide advanced functionality that enhances the Home Assistant experience. Each add-on is easily accessible in the Home Assistant Add-on Store, making it straightforward to install and configure to suit your specific smart home needs.
10. Home Assistant Community and Resources
The Home Assistant community is an invaluable resource for support, ideas, and inspiration. Here are some ways to connect and learn from the community.
Official Documentation and Forums
Home Assistant’s Official Documentation is a comprehensive resource covering installation, configuration, and advanced usage. Additionally, the Home Assistant Community Forums provide a space for users to share ideas, ask questions, and troubleshoot issues. Beginners and experts alike will find the forums helpful for solving problems and discovering new automation ideas.
Community Add-Ons and Custom Components
The Home Assistant community is highly active in creating custom components, add-ons, and integrations. Using HACS, you can explore these custom solutions and install them directly to your setup. Community contributions range from new device integrations to unique UI components, giving you access to a constantly growing array of tools for your smart home.
Tips for Troubleshooting and Support
When issues arise, start by checking the forums or official documentation. Additionally, Home Assistant has a built-in Check Configuration tool under Settings > System that can detect configuration errors. The System Log and Developer Tools are also helpful for diagnosing issues, offering insights into performance and device statuses.
11. Security and Privacy with Home Assistant
Home Assistant is designed with privacy and security in mind, but there are still steps you can take to secure your setup.
Securing Your Home Assistant Setup
Security is essential for a smart home platform, especially if remote access is enabled. Start by creating strong, unique passwords for your Home Assistant account and any integrations that require authentication. Avoid exposing Home Assistant to the internet unless necessary; if remote access is required, consider using Home Assistant Cloud for secure access.
Best Practices for Privacy in Home Automation
Home Assistant’s local operation ensures data stays within your network, enhancing privacy. To further protect your privacy, regularly review integrations and only install add-ons from trusted sources. Configure privacy settings for each integration, limiting external connections where possible.
For more security recommendations, see Home Assistant Security Documentation.
12. Backing Up and Restoring Home Assistant
Creating backups is a critical part of managing a stable and secure Home Assistant setup. Backups help protect your configurations, customizations, and data, ensuring that you can recover quickly from accidental changes, hardware failures, or software updates gone wrong. Here’s a comprehensive guide on why, when, and how to back up Home Assistant effectively, as well as how to restore your setup if needed.
Why Backing Up Home Assistant is Essential
Backing up Home Assistant allows you to:
- Safeguard Customizations: All your custom dashboards, themes, and automations are stored within Home Assistant. Without a backup, you’d have to recreate these from scratch in the event of data loss.
- Protect Against Hardware Failures: If your system’s storage (e.g., SD card on a Raspberry Pi) fails, a backup enables you to restore Home Assistant on a new device without losing your setup.
- Mitigate Risks of Updates: Occasionally, updates to Home Assistant or add-ons may lead to unexpected issues. A backup allows you to revert to a previous, stable version if needed.
- Simplify Migration: If you decide to move Home Assistant to new hardware, a backup ensures a seamless transfer of all your configurations and data.
For more information on backup options and recommendations, visit the Home Assistant Documentation on Backups.
Creating Regular Backups
Home Assistant provides a built-in backup tool that makes it easy to create and manage backups. You can create full backups, which include everything in your Home Assistant setup, or partial backups, which allow you to select specific parts, such as add-ons or configuration files.
Steps to Create a Backup:
- Access the Backup Tool: In Home Assistant, go to Settings > System > Backups.
- Create a New Backup:
- Click Create Backup to start a new backup.
- Choose Full Backup to include all configurations, add-ons, databases, and user data.
- Select Partial Backup if you only want to back up specific components, such as certain add-ons or integrations.
- Add Encryption (Optional): For added security, you can encrypt your backup file by setting a password. This is especially useful if you plan to store the backup externally.
Best Practices for Backups:
- Schedule Regular Backups: Set a routine, such as weekly or bi-weekly, to create backups. This ensures you always have a recent copy of your configurations in case something goes wrong.
- Before Major Changes: Always create a backup before making significant updates to Home Assistant or installing new add-ons. This minimizes risks associated with untested changes.
- After Major Updates: Once you have tested a new update or a significant configuration change, create a fresh backup of the stable setup.
For detailed guidance, check out the official Home Assistant Backup Tool Guide.
Where to Store Backups
Storing backups securely and accessibly is key to effective disaster recovery. Consider these storage options for added safety:
- Local Device: Store backups on a separate USB drive or external hard drive connected to your Home Assistant server. This allows for easy and fast recovery but doesn’t protect against physical hardware failure.
- Network Storage: Save backups to a Network-Attached Storage (NAS) device if available. This enables access over your network and protects your backup from individual device failures.
- Cloud Storage: Using cloud storage (e.g., Google Drive, Dropbox, or OneDrive) offers reliable off-site storage, which is crucial for protecting against disasters or major hardware failures. The Google Drive Backup Add-On for Home Assistant is a popular tool that can automate backing up Home Assistant to Google Drive.
- External Hard Drive or USB: For extra redundancy, copy backups periodically to an external drive that you store in a secure location.
Restoring Configurations from Backup
If you need to restore Home Assistant, whether due to a corrupted configuration, a failed update, or migrating to a new device, Home Assistant’s restore feature makes it straightforward.
Steps to Restore a Backup:
- Access the Backup Section: Go to Settings > System > Backups.
- Choose a Backup File:
- If your backup is stored locally on your device, it should appear in the list.
- If you have an external backup, upload it by clicking Upload Backup and selecting the file.
- Select Full or Partial Restore:
- Full Restore: Restores the entire backup, including all add-ons, configurations, and data.
- Partial Restore: Allows you to select specific parts of the backup, such as individual add-ons or certain integrations. This is useful if you only need to recover specific configurations without overwriting everything.
- Confirm and Restart: Follow the prompts to restore the selected backup. Once the restore process is complete, Home Assistant will restart to apply the restored settings.
When to Use a Restore:
- After a System Crash or Hardware Failure: If Home Assistant fails to start or experiences a hardware issue, restoring from a recent backup allows you to continue with minimal disruption.
- Reverting After a Failed Update: If an update introduces issues, you can revert to a backup to regain stability while troubleshooting.
- Migrating to New Hardware: A restore simplifies the migration process, allowing you to transfer all configurations and customizations to the new device without reconfiguring Home Assistant from scratch.
For a complete guide, refer to the Home Assistant Restore Guide.
Best Practices for Backup and Restore
- Automate Backups: Use the Google Drive Backup add-on or a similar tool to schedule automatic backups to cloud storage. This minimizes the risk of losing recent configurations if you forget to manually back up.
- Store Backups Off-Site: Storing backups on cloud storage or a secure, separate location ensures that they’re safe in case of local disasters like fire or hardware failure.
- Verify Backups Periodically: Check that your backups are complete and that the restore process works correctly. You don’t want to find out a backup is corrupted when you need it most.
- Name Backups Clearly: Label backups with dates or descriptions (e.g., “Post-update Backup 2024-11-01”) to help identify versions when restoring.
By following these steps and best practices, you can ensure your Home Assistant setup is secure and easily recoverable, no matter what challenges arise. Regular backups allow you to explore, customize, and expand your smart home setup with peace of mind, knowing that you can always restore your configuration if needed.
13. Advanced Home Assistant Setup
For those who want to fully utilize Home Assistant’s potential, advanced setups can open new possibilities for automation, integration, and efficiency. In this section, we’ll explore using Python with and without Node-RED, integrating Home Assistant with popular platforms, and examples of complex home automation projects.
Using Python with and without Node-RED
Python is a versatile programming language that adds flexibility to Home Assistant, enabling custom scripts, integrations, and automations. It can be used with or without Node-RED, depending on the level of control and complexity required for your automation tasks.
Using Python with Node-RED
Pros:
- Visual Flow Design: Node-RED provides a visual interface for creating complex workflows, allowing you to drag-and-drop nodes and visually design automation flows. This makes it easier to build and understand complex automations without extensive coding.
- Combines Python and Node-RED Functionality: By using the exec node in Node-RED, you can run Python scripts within your Node-RED flows. This allows you to leverage Python’s processing power while maintaining a user-friendly interface for managing flows.
- Integration with Other Protocols: Node-RED supports various communication protocols like MQTT, HTTP, and WebSocket, making it easier to integrate Python with these protocols through Node-RED.
- Modularity: Node-RED’s node-based approach makes it simple to modify individual parts of a flow without altering the entire automation. For example, you can add a Python script as a node to perform calculations or data processing without affecting the rest of the workflow.
Cons:
- Added Complexity: Integrating Python with Node-RED adds an additional layer, which can make troubleshooting and debugging more complex.
- Resource Intensive: Running both Home Assistant and Node-RED, along with Python scripts, can increase CPU and memory usage, especially on resource-limited hardware like the Raspberry Pi. This may require upgrades to hardware or optimization techniques.
Using Python without Node-RED
Pros:
- Direct Control: Using Python directly with Home Assistant allows you to build and run scripts without relying on Node-RED, providing more straightforward access to Home Assistant’s REST and WebSocket APIs.
- Greater Flexibility: You have complete control over the code, enabling more complex logic and customization without needing to adapt to Node-RED’s node-based system. Python scripts can access external libraries, APIs, and services, allowing you to perform complex data manipulations and API calls.
- Reduced Overhead: Without Node-RED, there’s less overhead in terms of memory and CPU usage, which is advantageous if you’re working on limited hardware or need high performance.
Cons:
- No Visual Interface: Without Node-RED, automations are managed entirely through code, which may be harder for users unfamiliar with programming to understand and maintain.
- Complexity for Multi-Step Automations: Creating complex, multi-step automations in Python requires more code, which may be less intuitive than Node-RED’s visual flows. This can increase the chance of errors and make troubleshooting more challenging.
Recommendation: If you’re comfortable with coding and prefer minimal overhead, using Python directly is a powerful choice. However, if you prefer a visual approach and plan to integrate complex workflows, combining Node-RED with Python might be the better option. Check out the Node-RED Integration Documentation for more on combining Python and Node-RED.
Integrating Home Assistant with Other Platforms
Home Assistant’s strength lies in its ability to connect with other smart home ecosystems, enabling you to control devices across multiple platforms seamlessly. Popular integrations include IFTTT, Amazon Alexa, Google Assistant, and Apple HomeKit. Here’s a look at the benefits and limitations of each.
Popular Platforms to Integrate with Home Assistant
- IFTTT (If This Then That):
- Pros: IFTTT provides a broad range of integrations and automations across devices and platforms that may not natively integrate with Home Assistant. It’s ideal for simple “if-then” automations and works well for cloud-based services.
- Cons: Some IFTTT applets introduce latency, as they depend on internet connectivity. Additionally, IFTTT has a subscription plan, which limits the number of free applets.
- Integration Guide: Check out the Home Assistant IFTTT Integration.
- Amazon Alexa:
- Pros: Alexa integration enables voice control of Home Assistant devices and allows for extensive smart home automations using Alexa routines. It supports devices and services in Amazon’s ecosystem, enhancing the versatility of voice commands.
- Cons: Home Assistant to Alexa integration requires an active internet connection, and some features are limited without a subscription to Alexa services.
- Integration Guide: Follow the Home Assistant Alexa Integration guide.
- Google Assistant:
- Pros: Google Assistant integration brings voice control and compatibility with Google’s smart ecosystem, including Chromecast, Nest devices, and Google Home speakers. It also enables “Hey Google” voice commands for controlling Home Assistant entities.
- Cons: Similar to Alexa, Google Assistant requires an internet connection, and advanced features may require a paid subscription.
- Integration Guide: For setup, see the Google Assistant Integration.
- Apple HomeKit:
- Pros: HomeKit integration allows Home Assistant devices to appear in Apple’s Home app, enabling Siri voice control and support for Apple’s ecosystem. HomeKit is known for its focus on privacy and security.
- Cons: HomeKit’s support for devices is more limited than Alexa or Google, and some configuration may require a HomeKit hub, like an Apple TV, iPad, or HomePod.
- Integration Guide: Refer to the HomeKit Integration Guide.
Pros and Cons of Integrating Home Assistant with Other Platforms
Pros:
- Enhanced Functionality: Integrations with platforms like Alexa, Google Assistant, and HomeKit add voice control capabilities and expand Home Assistant’s ability to interact with various devices, creating a unified smart home experience.
- Increased Automation Options: Services like IFTTT and Google Assistant allow Home Assistant to trigger automations based on external events, such as geolocation, time of day, or social media activity.
- Broader Device Compatibility: Integration with third-party platforms enables Home Assistant to control a wider range of devices that may not be natively supported.
Cons:
- Dependency on Internet Connectivity: Many integrations, particularly those with cloud-based platforms like Alexa and Google Assistant, require a stable internet connection to function correctly. This dependency can be a drawback for users seeking fully local control.
- Privacy Concerns: Some integrations with external platforms involve sending data to cloud servers, which may raise privacy concerns. Home Assistant’s local-first approach is more private, but external integrations often require sharing data.
- Cost of Premium Features: Some platforms, such as IFTTT, charge for premium features, limiting the number of free automations you can set up.
Recommendation: Integrate with platforms that add the most value to your setup. If privacy and local control are important, prioritize integrations that can operate locally (such as HomeKit). For voice control, Alexa and Google Assistant are strong options. For more on integrations, explore the Home Assistant Integrations Directory.
Examples of Advanced Home Automation Projects
With advanced setups, Home Assistant can handle ambitious automation projects. Here are a few ideas to inspire you:
- Automated Lighting Based on Room Occupancy:
- Project Overview: Using motion sensors, door sensors, and light sensors, set up automations that adjust lighting based on room occupancy and ambient light levels. For instance, if motion is detected in the living room after sunset, lights can automatically turn on to a dimmed level.
- Required Integrations: Motion sensors, smart lights, and Node-RED for multi-step workflows.
- Documentation: See examples in the Home Assistant Community Projects.
- Energy Monitoring and Efficiency Optimization:
- Project Overview: Integrate smart plugs, energy meters, and thermostats to monitor energy consumption, optimize usage, and reduce waste. Set automations to turn off unused devices or adjust thermostats based on the time of day.
- Required Integrations: Smart plugs, energy meters, thermostats, and optional integration with Google Assistant or Alexa for voice control.
- Documentation: Check the Energy Management Guide for step-by-step instructions.
- Home Security Automation:
- Project Overview: Create a comprehensive security system using cameras, motion sensors, and door sensors. Automations can send alerts when suspicious activity is detected, trigger sirens, or turn on exterior lights if motion is sensed near the house.
- Required Integrations: Cameras, door/window sensors, motion sensors, and push notifications.
- Documentation: Visit the Home Security Guide for more details.
By combining Python, Node-RED, and integrations with other platforms, you can turn your Home Assistant setup into a powerful, responsive smart home hub capable of managing intricate autom
ations and delivering a seamless experience. For more project ideas and community contributions, browse the Home Assistant Community Project Showcase.
13. Conclusion
Home Assistant provides an unparalleled platform for managing and enhancing your smart home, no matter your level of experience. From basic automation to complex, multi-platform integrations, Home Assistant empowers users to take control of their environment. In Part 1, we covered the fundamental setup and core features, guiding you through installation, adding devices, and creating initial automations. Part 2 introduced customization and advanced tools, such as Node-RED, MQTT, and Python scripting, allowing you to push Home Assistant’s capabilities to new heights.
The flexibility of Home Assistant’s dashboard customization, combined with the power of community-driven add-ons like HACS, allows you to build an interface tailored precisely to your needs. Integrations with popular platforms like Alexa, Google Assistant, and IFTTT provide seamless interaction with other smart home devices, while local control ensures privacy and security for those concerned about data sovereignty.
Backing up your configuration is essential for maintaining stability, and Home Assistant makes this easy with automated options and external storage recommendations. Advanced users can delve deeper, utilizing Python with or without Node-RED for even more granular control, and extending Home Assistant’s capabilities to automate complex, multi-device scenarios.
Home Assistant’s vibrant community is a valuable resource, offering support, add-ons, and countless creative ideas. As you continue to explore and expand your setup, the community forums and official documentation provide guidance and inspiration for every step of the journey.
Ultimately, Home Assistant is a platform that grows alongside your smart home. With continuous updates and community support, it evolves to meet new challenges and integrate emerging technologies. Whether you’re looking to save energy, enhance security, or simplify daily routines, Home Assistant offers the tools to turn your home into a fully customized, automated environment. Embrace the flexibility and power of Home Assistant, and enjoy the journey toward a smarter, more responsive home.
For further learning, explore the Home Assistant Documentation and join the Community Forums to stay connected with the latest updates, tips, and community-driven innovations.